
2-STEP / LINE-LOCK SWITCHES MUST NOT RELEASE FROM TOP OF CLUTCH PEDAL TRAVEL!!! With the ClutchTamer operating properly, your clutch pedal will not return to the top of it's travel until several seconds after the clutch pedal is released. Depending on your settings, it may not return to the top of it's travel until after your run is complete! If you use an oem style upper clutch pedal switch to release the 2-step and/or line-lock, the result at minimum will be a several second delay of when the pedal contacts the clutch switch. Late release of the 2-step will likely only cause a performance issue, but late release of the line-lock will cause a HUGE SAFETY ISSUE! Please make sure that your line-lock is not releasing AFTER the clutch hits!
ALWAYS RELEASE THE CLUTCH PEDAL FROM THE STOP WHEN CLUTCH TUNING or LAUNCHING !!! Before you install or test your ClutchTamer, it's very important that you install a clutch pedal stop and verify it's proper adjustment. By proper adjustment, we mean a setting that allows enough clutch dis-engagement to achieve clean hi-rpm shifts, also enough dis-engagement to be able to put the transmission into gear without grinding when the clutch is warm. Using a pedal stop helps ensure a consistent release point, which in turn helps ensure that you get repeatable results. If for some reason you have to change your pedal stop height after you begin the setup process (maybe you find the clutch isn't releasing cleanly which causes a shifting problem), you will need to go back to Step 1 and do the setup process all over again.
DO NOT "PRE-LOAD" YOUR CLUTCH BEFORE LAUNCH!!! It is important to release the clutch from a properly adjusted pedal stop. Many import racers "pre-load" their clutches in an attempt to minimize parts breakage, DO NOT do this when using the ClutchTamer. Pre-loading is basically releasing the clutch pedal to a point where the clutch starts to drag before the green turns on, an attempt to take all the "slack" out of the drivetrain. Pre-loading while using the ClutchTamer will result in less pedal travel on the launch and more pedal travel during shifts, which will result in excessive clutch slip after shifts made using the clutch pedal.
LAUNCH RPM CHANGES CAN AFFECT YOUR CLUTCH TUNEUP!!! Even without any sort of "centrifugal assist", a typical 10.5" diaphragm style pressure plate can gain around 350lbs of clamp pressure going from 4000rpm to 7000rpm. You can choose any launch rpm you want, but it's a good idea to keep launch rpm consistent if you want consistent results.
TRY TO KEEP CLUTCH TEMP CONSISTENT- Clutch temperature can affect how hard your clutch grabs. Organics will lose friction as the temps go up, while iron actually gains friction as temperatures go up. Most dual friction discs tend to gain on one side while losing on the other. Bottom line is try to avoid "back to back to back" test hits without some clutch cooling time in between. If the engine is running, 5 min of cooling time between hits is usually enough. A non-running engine will need 10-15 min between hits due to less air circulation. In a tight bellhousing, maybe more.
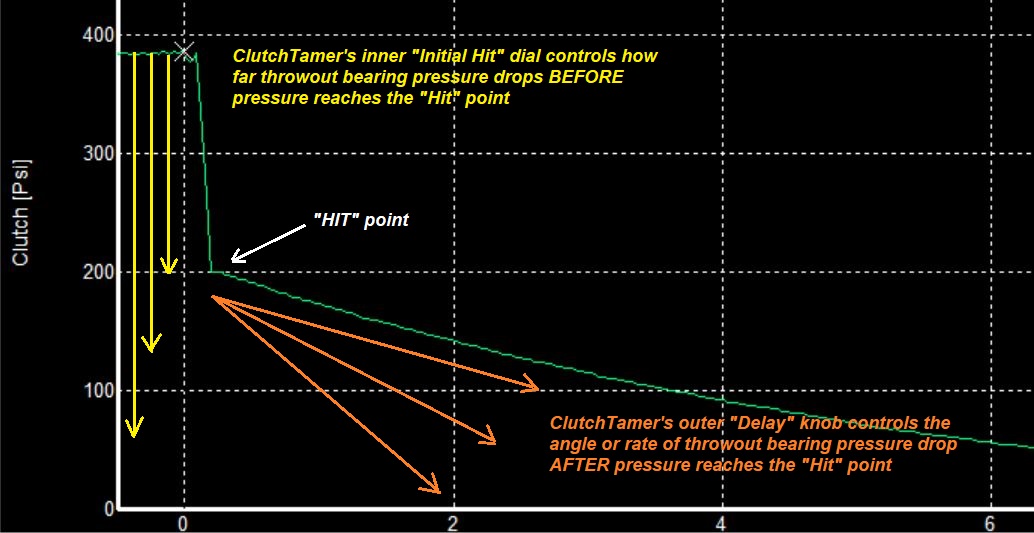
Outer "DELAY" Knob- the ClutchTamer's outer "delay" knob's function may be easier to understand if you think of it as an "anti-bog" adjustment. The slower the clutch pedal moves after the hit point, the slower the clutch will pull the engine down. This gives the car more time to accelerate before the clutch locks up, which in-turn reduces bog...
Inner "HIT" Dial- the ClutchTamer's inner knob function may be easier to understand if you think of it as controlling traction. Adjusting the inner dial changes the distance between the ClutchTamer's inner dial and outer knob, the separation between those two is what determines exactly where in the clutch pedal's return travel that the ClutchTamer becomes effective...
......turning the outer knob clockwise reduces engine bog during launch.
......turning the outer knob counter-clockwise makes the clutch pull the engine down quicker during launch.
......turning the inner dial clockwise makes the clutch hit harder, more likely to spin the tires.
......turning the inner dial counter-clockwise makes the clutch hit softer, less likely to spin the tires.
...1- Avoid over-clutching the car if possible! With a diaphragm clutch, it's can be hard to perfectly match the clutch to the application. That typically means most diaphragm applications will end up with too much clutch. It's best to install a clutch that has just enough overall capacity to handle all the power that you are going to put thru it over the disc's entire lifespan, as this will give you the broadest possible clutch tuning window. If your pressure plate has adjustable static clamp pressure, you should get this in the ballpark before proceeding.
...2- Line-lock and 2-step switches should not release from top of clutch pedal travel- With the ClutchTamer controlling clutch engagement, your clutch pedal may not immediately return to the top of its travel when the clutch pedal is released. If you use an oem style upper clutch pedal switch to release the 2-step and/or line-lock, the result could be a second or so delay of when the pedal contacts the clutch switch. Late release of the 2-step will likely only cause a performance issue, but late release of the line-lock will cause a safety issue. Please make sure that your line-lock is not releasing AFTER the clutch hits!
...3- Adjust the clutch pedal stop- Before you adjust the 'tamer, it's very important that you install a clutch pedal stop and verify its proper adjustment. By proper adjustment, we mean a setting that allows enough clutch dis-engagement to achieve clean hi-rpm shifts, but also one that does not cause the car to creep with the clutch pedal against the stop at launch rpm. Using a pedal stop helps ensure a consistent release point, which in turn helps ensure that you get repeatable results. If for some reason you have to change your pedal stop height after you begin the tuning process (maybe you find the clutch isn't releasing cleanly which causes a shifting problem), you may have to go back and repeat the tuning process all over again.
...4- Initial Outer "Delay" Knob Setting- slowly turn the outer "delay" knob counter-clockwise until you feel a slight resistance. The point where you feel that slight resistance is the "0" point in the delay setting. There are about 10 turns of clockwise adjustment available. After finding that "0" starting point, set the outer knob to "1" turn clockwise from zero.
...5- Initial Inner "hit" dial Setting- set the ClutchTamer's inner "initial hit" dial to a setting that stops the pedal at about 2/3rds of the way up after a simulated launch from the pedal stop with the engine "off".
...6- Determine a Suitable Launch RPM- Changing launch rpm can affect your clutch's 1st stage inertia draw rate!!!!!! Even without any sort of "centrifugal assist", a typical 10.5" diaphragm style pressure plate can gain around 350lbs of clamp pressure just by going from 4000rpm to 7000rpm. For best ET, you generally want to stage at least 2000rpm above your engine's torque peak. You can choose any launch rpm you want (typically the higher the better), but it's a good idea to keep launch rpm consistent from run-to-run if you want consistent results.
...7- Adjusting the Initial Hit- time to make some hits!!! The first few hits shouldn't last more than a second or so. It helps to have a friend watch the tires from outside the car to verify the difference between tire spin and clutch slip. Make a hit and adjust from there.
...8- After letting the clutch cool, it's time to use the outer knob to dial out engine bog- If the clutch is well matched to the combination, a "0" outer knob setting might be required. If on the other hand the clutch you have can hold a lot more torque than your engine is putting out, an outer knob setting of "7" turns might be required. The basic goal of the outer knob setting is to keep the clutch from pulling the engine below it's torque peak during launch.
NOTE- The above procedure will get you to about 90-95% of your potential. To get that last 5-10%, you will likely need some data. Timeslips from the track are very useful, but adding a data recorder can save a lot of trial/error testing.
For a quick et and minimal reaction time, don't be afraid of launch rpm. Launch rpm is basically stored energy, and the engine has to make the energy that it takes to spin up that rotating assy. The higher you can spin it up prior to the start, the more power that will be available to accelerate the car when the clocks are running. The ClutchTamer is there to control that energy flow, we want the clutch hit to be aggressive enough to get things moving as quickly as possible without bogging the engine.
When you are done, be sure to measure/record your initial hit setting and the conditions. This will help you build a library of clutch tunes to draw on in the future. The most common method for the hit setting is to measure the gap between the inner "Initial Hit" dial and the inner part of the dash bracket's slide bushing. A small dial caliper works great. The gap you are measuring can be seen in the center of the picture to the right.
Another method to reference a particular setting if you have a hydraulic release system, is to install a pressure gauge to measure psi at the slave/throwout bearing. Basically idle the car in neutral, then record the psi number at the "hit" during a simulated launch. We define a simulated launch as simultaneous release of both the clutch pedal and line lock button, with the engine idling and the transmission in neutral. The object is to cycle the components while the clutch is rotating, an idling engine makes the results more consistent by minimizing any added effects due to centrifugal forces.
The below graph shows the centrifugally increasing hydraulic throw-out bearing pressure of a typical diaphragm pressure plate.
......Do the tires spin? adjust the inner "initial hit" dial a couple turns counter-clockwise, repeat the hit.
......Does the clutch slip? adjust the inner "initial hit" dial a couple turns clockwise, repeat the hit.
At this point we want the clutch to bog the engine against WOT, the goal here is to find the inner dial setting that bogs the engine as fast as possible without spinning the tires.
...Red- engine rpm (ranges from idle to 6900)
...Green- throw-out bearing Psi (ranges from 444psi to 600psi)
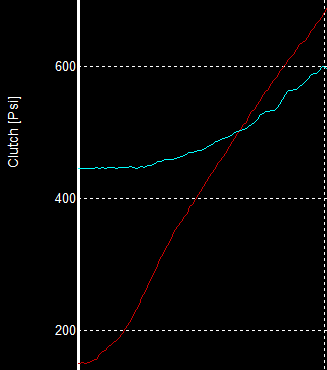
For this test, the clutch pedal was held in a single position against its travel stop, then hydraulic pressure data was logged as engine rpm increased. As you can see, centrifugal forces have little effect on throw-out bearing Psi below 2500rpm. While the pressure plate's pressure ring position did not change, notice that Psi increased from 447psi @ 2500rpm to 600psi @ 6900rpm due to centrifugal forces acting on the diaphragm's levers. That's a 156psi gain due to rpm only, with no change in lever position. This shows that throw-out bearing Psi is not an accurate indicator of lever position above 2500rpm. For that reason, we suggest that only Psi data from around idle speed be used for setup/tuning comparison purposes.
For clutch tuning our Shop Mule test car, we added a pressure sensor to the end of our hydraulic throw-out bearing's bleed hose. That pressure sensor's data is displayed to the driver by a Racepak Intelli-gauge, allowing for precise on the spot 1st stage clamp pressure changes without consulting a laptop. The Racepak data recorder is set to initiate a test session when triggered by the line-lock button. After data collection starts, we then put the shifter in neutral and "dry-snap" the clutch pedal @ idle prior to staging. That gives us a recorded snapshot on that run's graph showing the throw-out bearing's Psi release curve, leaving no doubt about what clutch control adjustments might have been in place for that pass.
G-meter output is affected by pitch rotation, which basically means a 6k/1.75g launch with a big wheelie could actually be slower than a 5.5k/1.45g launch with a smaller wheelie. You will be able to compare runs with more accuracy if you first zero the runs to the first movement of the g-meter, then overlay the runs to compare the differences in both Erpm and DSrpm traces.
Most important for clutch tuning is the angle/shape of the Erpm trace as it is falling, as this is the ONLY part of the trace that is basically controlled by the clutch when the engine is at WOT. This is where you will be able to see area added "under the curve" to the rpm trace after the launch and after shifts, which are generally indicators of increases to power production which were made possible by adding/controlling clutch slip.
To verify overall gains from clutch tuning, compare the time it took from first movement of the G-meter to a selected DSrpm just before the finish line. These are points in the run where wheel spin is least likely, which in turn means they are points more likely to be accurate indicators of vehicle speed (this assumes of course that you are concentrating on clutch tuning, with no changes to gearing/tire size/air pressure). Basically you are looking for the quickest time overall from first movement of the G-meter, to a selected DSrpm just before the stripe.
You can also compare clutch performance during individual shifts on different runs by selecting a DSrpm just before that shift, as well as a DSrpm just before the next shift, then comparing the times between those two points.
If you plan to shift clutchless, adding even more delay has the diminishing affect of softening shift harshness. Some prefer to take it a step further and combine that added delay with an adjustable base pressure plate (without any added centrifugal assist). It basically gives them a direct way to adjust the clutch's breakaway torque, which affects the harshness of a clutchless shift. Choosing a non-adjustable PP can also get you there and will generally cost less money, but you will probably need to add some shims under the PP to get the wheelspeed spikes after those clutchless shifts under control.
I only want the 'tamer to slip during launch, not after the shifts.
For those with wanting to minimize slip after the shifts, just set the clutch pedal stop a little deeper than normal. From there, launch from the pedal stop but don't bounce off the pedal stop for the shifts. You get the full effect of the 'tamer during launch, but then it does not fully re-set for the shifts.
...Diaphragm clutch guys typically have a lot of excess clutch capacity, for most the above works well. For those where the clutch capacity is already pretty well matched to the application, adding a simple 1/4" thick drop-out spacer between the 'tamer's outer knob and the dash bracket before staging may be needed. The 'tamer cylinder's spring tension will hold the spacer in place while you stage. When you dump the clutch to launch the car, the gap between the outer knob and slide bushing will increase, which in-turn allows the spacer to drop out. If you decide to go that route, a little chain can keep the spacer tethered to the dash bracket so you don't lose it.
...Diaphragm clutch users tend to think that if the clutch slips at all after the shifts, their engine's power is not getting applied to the track. Truth is slip after the shifts is a feature that is designed into a properly tuned centrifugal assist "slipper" clutch, which helps keep engine rpm up where the engine makes more power. That power increase more than offsets the loss of efficiency due to slip. With a little creativity, you can also have that advantage with a diaphragm.
Is there a ballpark "initial hit" setting that I can use to get started?
No, there are just too many variables. Even two cars with identical engines and clutch setups, but with different pedal stop adjustments, will require different initial hit settings.
My clutch pedal doesn't have enough time to return all the way up before it's time to shift. Is this a problem?
That's normal, and more noticeable when the clutch has a lot more capacity than the engine. Basically it's because the target window between a "properly firm initial hit" and "clutch lockup" is very narrow, and we are using the ClutchTamer's delay function to widen that window. It's not a bad thing and actually speeds up your wot shifting, as it effectively shortens pedal travel. Because the pedal has not yet returned all the way back to the top, now your foot won't have to waste time pushing the pedal thru that deadband area when you reach your shift point.
Can I use a ClutchTamer with a SoftLoc style clutch?
Yes, you can. The main benefit will be that you will no longer have to compromise your launch rpm to keep your clutch from slipping in high gear. If you have a street/strip car, installing a ClutchTamer will allow you to develop a clutch tune for the track that can be driven on the street without burning up the clutch. Waaay less hassle with the 'tamer controlling the hit, no longer will you need to make adjustments inside the bellhousing to switch between strip and street settings.
Here's what you need to do-
...1- remove all added weights from the levers.
...2- increase clutch base pressure until it holds high gear.
...3- install a 'tamer to soften the launch.
...4- raise launch rpm to match your shift rpm.
...5- using the 'tamer, adjust the hit until the clutch pulls the engine down from launch rpm to torque peak.
Removing the weights from the levers will reduce flex in the clutch assy, you won't need as much throwout bearing gap.
You might be able to calculate your current base/weights/rpm to determine how much clamp "holding high gear" requires, that would give you a ballpark starting point for cranking up the base. Remember to account for lever rpm, even without extra weights those bare levers still add clamp as the rpm goes up.
Installing a 'tamer allows you to adjust the launch independently, without affecting the clutch's ability to hold high gear.
Raising launch rpm to be the same as your shift rpm will make more energy available to launch the car. Instead of the rotating assy absorbing energy during launch, it will be adding net energy to the input shaft. Raising launch rpm from 5500 to 7000 will make 62% more energy available, also more closely aligns your clutch tune needs for launch vs shifts.
Adding the 'tamer transforms a clutch hit that would otherwise be too intense, into a hit that's less intense but longer lasting. It basically conditions that added launch energy to a level the chassis can process.
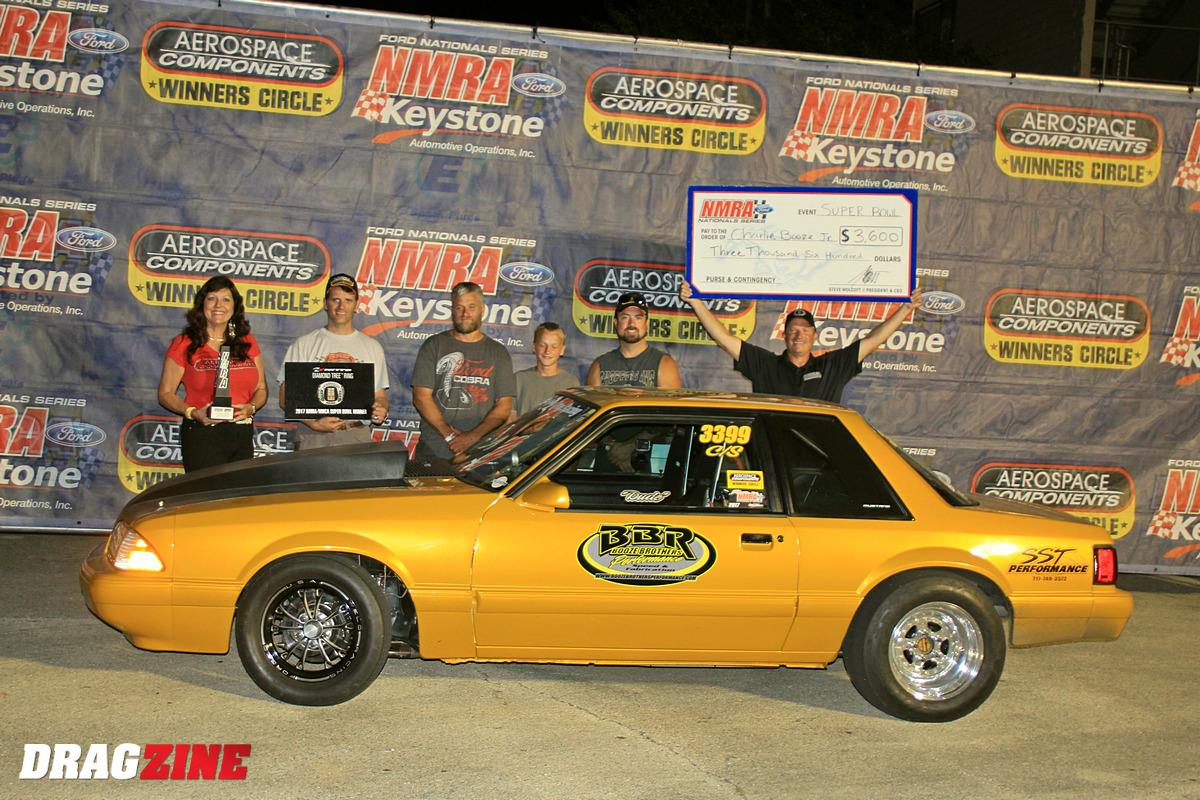
Congrats to Coyote Stock Winner and ClutchTamer user Charlie Booze Jr & his crew, shown here picking up a $3600 check at the NMRA/NMCA SuperBowl event!
If you have any questions, feel free to e-mail me