website:www.grannysspeedshop.com...e-mail:grannysspeedshop@verizon.net
phone: 360-391-1208 or 360-853-8219
GSS Torque Arm / Solid Axle Conversion System
(TA/SA conversion)
'79-'85 RX-7 / Ford 8.8 DIY Kit Installation overview
Before you begin a Torque Arm conversion, there are a few decisions to consider that can effect the direction of your project. For instance, you may be going after an import style "Tuner" theme which might require wheels with a lot of "backspace" or "positive offset" to achieve the right look... a stock width rear might be just what you need. If you are after the lightest possible combination for a racing application or just want a drag race look, maybe a narrower rear using deep wheels with very little "backspace" or "negetive offset" would be better for your goals. Here's a list of questions that should be answered before proceeding...
Performance expectations? Is a TASA conversion right for you?
How wide? stock RX-7 width or something narrower?
What style Ford 8.8 housing should you be using?
What brakes do you plan to use on the rear?
What gear ratio?
Do you really need C-clip eliminators?
The following section will explore each of these questions and provide some possible options that we hope will help you get the most out of your project.
Note that below when we refer to a width dimension with regards to a rear axle, we use either WF/WF (wheel flange / wheel flange) or AF/AF (axle flange / axle flange)...
Performance expectations? Is a TASA conversion right for you?
The '79-'85 RX-7's 4 link rear suspension works fair overall, and it's design geometry actually helps the RX-7's stock rear survive some amazing abuse. Unsprung weight is low, helping the car's ability to to stick the rear tires over rough surfaces. If performance over rough surfaces is most important to you, you might want to consider retaining the RX-7's stock 4 link.
If all that sounds like too much of a compromise, then you may be ready to step up to our Torque Arm / Solid Axle Conversion. Our design gives you all the tire planting ability of a ladder bar suspension, while still allowing body roll, an absolute requirement for consistant hi-speed maneuvering. Excessively high spring rates or ride heights are no longer required for getting the most from your launch. Rear tire camber and toe also remains consistant, giving the driver reliable feeback when he needs it most.
How wide? stock RX-7 width or something narrower?
The '79-'85 RX-7 rearend came in two widths and lug patterns...
If your RX-7 already has the look you want or you are just doing a solid axle conversion to obtain a more favorable gear ratio and want the car's outward appearance to remain unchanged, the RX-7's stock WF/WF width may be just what you need. The 8.8 rear from an '86-'93 Ford Mustang provides a good starting point, but even it will need to be narrowed.
FYI, there are a 2 "low-buck" narrowed rear combinations that are possible using stock Ford axles. Both combinations will have RX-7 friendly 5 on 4-1/2" lug patterns.
What style Ford 8.8 housing should you be using?
...If you plan to narrow a 8.8 rear for your car, there are a few housing choices out there. The shape of the casting's nose will vary depending on the style of 8.8 you decide to use. As our Torque Arms are custom fitted to each style of casting, we will need to know what style you plan to use. The common choices are...
What brakes do you plan to use on the rear?
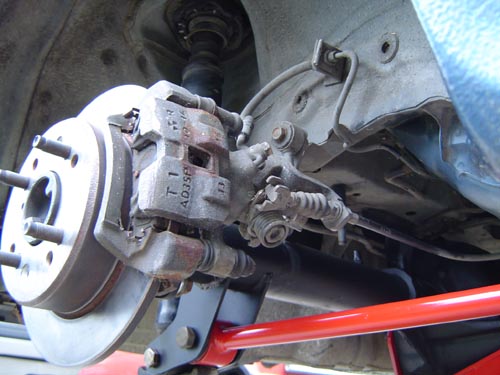
For simplicity, we prefer to use the original 13b RX-7 rotors and calipers. This will get you a more common 4 on 4-1/2" lug pattern, and even allows using oem 13b parking brake linkage. If you want to use Mustang brakes, drum or disc, fabrication will be required for e-brake cables.
If you RX-7 has 12a rotors and calipers, those can be retained as well. You will have a choice of re-drilling your Mustang axles to maintain the RX-7's lug pattern, or re-drilling your RX-7's rotors for the Mustang 4 on 4-1/4" lug pattern.
A word of caution if you plan to use RX-7 rotors on your Ford axles, there may be a minor problem that will need corrected...the axle's flange diameter will likely be larger than the machined inside face of the rotor. Either machine the inside face of the rotor larger to 6.100", or machine the outer diameter of the axle's flange down to 5.850". Machining the axle flange's O.D. is preferred, but either remedy will do.
What gear ratio?
Your ultimate choice for rear gear ratio will depend on many factors. Most are compromised to obtain the best overall combination for performance. Here's a simplified list of common available ratios and what we feel they are generally best suited for in a typical V-8 powered, stock wheelwell RX-7...
If you happen to be digging thru a wrecking yard looking for an Explorer rear to narrow, useful info can be found on a sticker on the driver's side door jam. This sticker will have an axle code which indicates the original rear gear ratio and diff type. The Explorer axle codes are as follows...
Do you really need C-clip eliminators?
Sanchioned drag racing have long had blanket rules requiring c-clip eliminators when a car surpasses a certain level of performance. The same rule applied to all cars and all rears, regardless of specifics. These were good rules that fit the times in the old days, but we feel the rules are now outdated, and should be modified. The problem with c-clip rears was that when an axle broke, the entire axle, wheel, and tire typically came out of the rear and left the car, a very dangerous situation at any speed. Most all cars in those days had drum rear brakes, and nothing was left to retain the outer part of the broken axle. In the modern times, many cars will use disc brakes in the rear. There is just no way that an axle can come out of the rear unless it rips the entire caliper off with it. We feel that there should be an exemption for disc brake rears. But rules are rules, so if you plan to participate in sanchioned drag racing, eliminating the c-clips will be necessary, regardless of drum or disc rear brakes. C-clip eliminator kits are out there for around $150 or so, and basically just convert your outer wheel bearings to a press-fit retained style. They are also typically leak prone, and more trouble than they are worth if you have rear disc brakes. In our opinion, if you are using drum rear brakes on a fast car, they are worth the investment and trouble. If you are using disc brakes on the rear, we would not use nor recommend c-clip eliminators unless they were forced upon us. If you are narrowing an 8.8 rear and are using drum brakes, or plan to participate in sanchioned events, the best current solution that we recommend is to build the rear from the ground-up as a hybrid, using 9" style housing ends, bearings, and axles.
......WF/WF takes into account the thickness of the rotor or brake drum's center, which can be as thin as .065 for a drum or as thick as 1/4" for a brake rotor, per side.
......AF/AF is the assembled axle flange/flange width only, and does not allow for drum or rotor thickness.
Important points to consider if you are trying to calculate fitment or just trying to get the most wheel/tire possible into the stock RX-7 wheelwells.
If you find that forward traction is an area that needs work on your car, there are a few things you can do to maximize your stock RX-7' 4-link. The main problem is that the Mazda design allows the rear to "squat" under accelleration. This squat minimizes the rate of weight addition to the rear tires under accelleration. A slow rate of transfer leaves some potential on the table when it comes to maximizing forward traction, as the tires may begin to spin before they receive all of their additional weight. Addressing these issues is possible, but the fixes compromise the stock suspension's handling, reducing it's potential from a roadworthy status to a point closer to "drag race only". Here's a list of typical drag race inspired modifications for the stock RX-7 4 link...
...raise the rear of the car...
...stiffer rear springs...
...stiffer rear shock compression...
These solutions can get you down to a 1.5 or so 60' time with a well sorted car. The ultimate failure point of the '79-'85 limited slip rear is usually an axle, which tends to fail in manual transmissioned cars as they approach the high to mid 10sec 1/4mi level of performance. If you go with an automatic transmission, the failure point is typically delayed to around the hi to mid 9sec 1/4mi level of performance. Any wheel-hop will bring on component failure that much sooner.
...'79-'85 12a cars were 56-3/4" WF/WF with a 4 on 110mm lug pattern.
...'79-'85 13b cars were 58-3/8" WF/WF with a 4 on 4-1/2" lug pattern.
Each lug pattern used wheels with a different offset, so people that mix-and-match the stock 1st gen cars/rears rarely even notice that they are a different width.
If one of your goals is to build the lightest possible car your budget allows, a narrower rear axle combined with the deeper wheels will result in shorter axles and shorter axle tubes for a given track width, shaving unsprung weight without adding to the rear wheel's rotating weight.
......NARROWED 53-1/4" AF/AF WIDTH USING STOCK FORD AXLES...6-1/4" narrower than the stock 2nd gen RX-7 rear (3-1/8" per side), made possible by using 2 right side Ranger axles (26-1/4" long), resulting in a 9/16" pinion offset. These axles are 28 spline and use passenger car sized bearings. Narrow the only left side of a 4.0 Ranger 8.8 housing, or both sides of most any passenger car 8.8 housing. Will require using a 28 spline differential.
......NARROWED 56-1/2" AF/AF WIDTH USING STOCK FORD AXLES...3" narrower than the stock 2nd gen RX-7 rear (1-1/2" per side), made possible by using 2 right side Ford Explorer axles (27-13/16" long), resulting in a 9/16" pinion offset. These axles are 31 spline and use larger truck sized axle bearings. Narrow only the left side of a '91-'94 Ford Explorer rear housing. Will require using a 31 spline differential.
......'86-'93 Mustang / full size car...has 2 external ears, one on each side of the pinion housing. Uses 2-3/4" dia axle tubes and small axle bearings.
......'91-'01 Explorer / full size truck...has one external ear on the right side of the pinion housing. This housing is about 10lbs heavier than a Mustang version, mostly due to larger 3-1/4" diameter axle tubes that are almost 1/4" thick. Also uses larger truck axle bearings. This housing has a very large external ABS sensor and guard lugs located above the ring gear. The ABS sensor will need to be removed, the hole plugged, and the guards cut off and ground down to provide clearance for our upper watts linkage rod, which passes over the rear's center section.
NOTE-...although the stock Explorer rear is 59-1/2" wide, it is not suitable to use in a RX-7 if a 59-1/2" width is desired. The Explorer used un-equal length axles resulting in a whopping 2-3/4" pinion offset, not practical for our purposes. Only start w/ an Explorer rear if you want a rear 56-1/2" WF/WF or narrower. If you want to use heavier Explorer style center with the larger axle tubes and maintain a stock 59-1/2" WF/WF width, the best option is to narrow a wider 8.8 from a full size truck.
......'84-'85 Full size passenger car...has no external ears. This is the lightest 8.8 housing of all, and uses smaller 2-3/4" dia axle tubes.
......3.08...recommended for daily drivers seeking best overall fuel economy
......3.27...good compromise for a balance of economy and performance
......3.55...good gear for average street/strip car using non-overdrive transmission
......3.73...excellent choice for a fast street/strip/track/drag car with 130mph or better 1/4mi potential. We feel this is the best all around gear for real supercar performance
......4.10...drag only unless you have an overdrive transmission.
41....3.27 w/ open diff
43....3.08 w/ open diff
44....3.73 w/ open diff
45....3.55 w/ open diff
D1....3.27 w/ TracLoc diff
D2....4.10 w/ TracLoc diff
D4....3.73 w/ TracLoc diff
D5....3.73 w/ TracLoc diff
Tools & Equipment Required
Preparing your housing...
Proper prep of your housing depends on your plans for it. If you are not narrowing the housing, prep will consist of cleaning the outside, cutting off the old suspension brackets, and grinding off the remaining weld material from the axle tubes.
Measuring and cutting your axle tubes...
If you plan to narrow your rear, prep will be quite a bit more involved. So involved, that we recommend that the housing get completely dis-assembled. Remove the rear cover, and mark the bearing caps to prevent later mix-ups or confusion as to their correct position. Then remove the caps and pry out the differential, taking care to keep the bearing races and pre-load shims in their correct positions. At this point, we usually just run a wire thru the center of the diff's bearing bores to keep the spacers and bearing races in their proper place, tie the ends of the wire together, then place the diff in a box with the bearing caps, bolts, center pin, and c-clips for temporary storage. If the housing already has the gears that you plan to use, the pinion can stay in place. If you are changing gears, strip the pinion out as well.
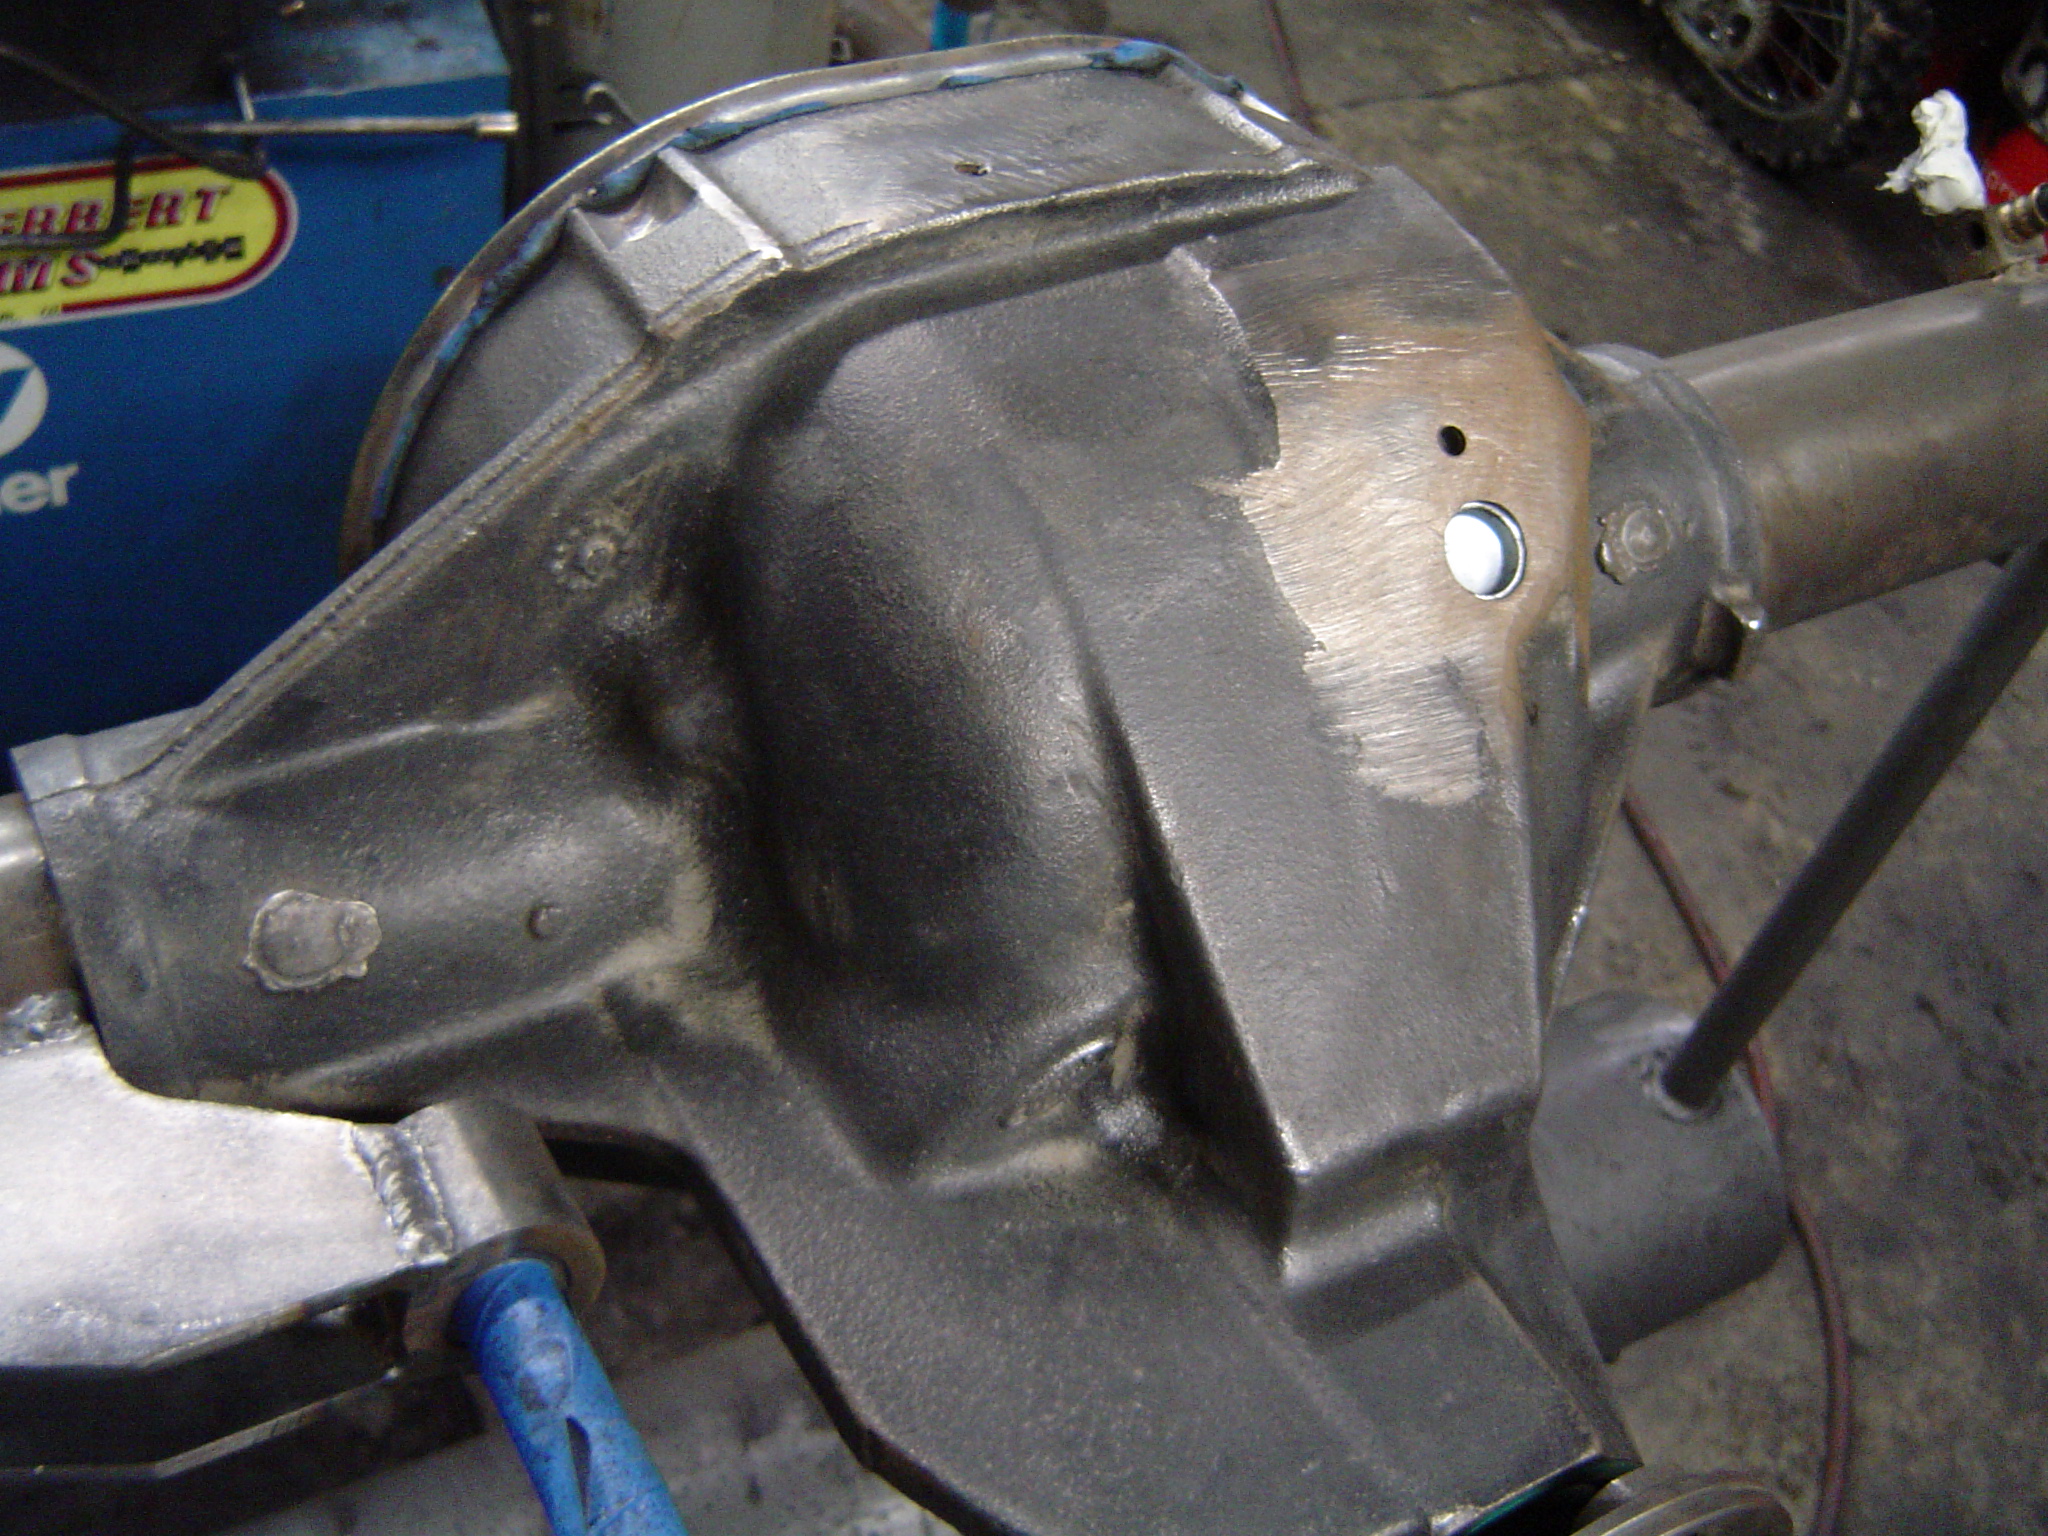
If your housing is from a truck and has the big ugly ABS sensor and guard lugs protruding upward from the front/top of it's center case, these will need to be removed. Remove the ABS sensor and drive a 13/16" expansion cup coated w/ loctite into the empty ABS sensor hole, driven in all the way down until it is flush with the inner surface of the case above the ring gear. Then use a sawzall or cutoff wheel in a hand grinder to remove the large part of the guard lugs, followed up by cosmetic blending with a hand grinder. Be careful not to get carried away with the cosmetic blending, as there are contoured areas inside the top of the case where excessive grinding on the outside can go all the way through, create a hole, and ruin your case.
Here's a list of recommended tools and equipment recommended for a sucessfull installation...
...Tools...
...Equipment...
The housing below on the left shows the ABS sensor and it's guard lugs, the one on the right has had it's sensor removed, the hole plugged, and it's guard lugs have been removed. A sawzall followed up by a hand grinder will get the job done...

When narrowing an 8.8 axle tube, we recommend making the cut at a point exactly 2-1/2" inboard from the outer face of the axle's flange. This is a point far enough in-board to get the effects of welding away from the machined bearing fits, and still allow us enough room to install all the brackets before welding the tube end back on, necessary to achieve the most accurate housing alignment.
Here's some facts that you will find very handy if you are trying to calculate overall housing width, axle length, and axle tube length, trying to come up with something that works for you...
...the 8.8 pinion shaft is offset 9/16" to the right of the cast housing's center.
...the cast centersection of an 8.8 is very consistantly 16-3/8" wide.
...the 8.8's diff's center pin is centered in the cast centersection.
...both axles will extend an equal distance into the 8.8 cast center.
...the 28 spline diff uses a 3/4" dia center pin.
...the 31 spline diff uses a 7/8" dia center pin.
...8.8 axles are measured from outside face of lug flange to the tip of the c-clip button.
...AF/AF width is the sum of right axle length, left axle length, and center pin diameter.
...axle tube length is measured from the outside face of it's outer flange to the edge of the cast center section.
...brake offset is measured from the outside face of the axle's lug flange to the outside face of the axle tube's flange.
...the brake offset dimension needs to be correct for the brakes used to place the caliper correctly over the rotor.
...axle tube length can be varyied within reason to achieve a desired brake offset.
If you plan to order custom axles for your narrowed 8.8, here's some info that may be useful...
...8.8's from passenger cars, Rangers, and Aerostars use the smaller passenger car sized axle bearings / seals / 28 spline axles.
...8.8's from full size trucks, Explorers, and vans use the larger truck sized axle bearings / seals / 31 spline axles.
...order the axle's flange dia, lug pattern, lug hole dia, and center pilot dia for the brakes you plan to use.
...28 spline axles use a c-clip button that's .250" thick.
...31 spline axles use a c-clip button that's .300" thick.
...28 and 31 spline differentials can be interchanged as long as the appropriate axles are used.
...axles can be ordered with 31 splines and the smaller passenger car sized wheel bearing diameter.
Recommended maintenance...
After the dirty work is done on the outside, maintenance should be performed. Remove the rear cover and clean the gasket surface. Does your TracLoc need new clutches? Now's the time to do it.
Installing lower link brackets on your axle tubes...
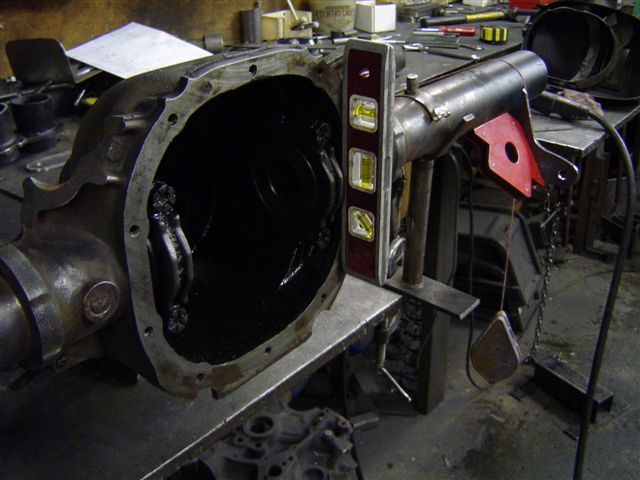
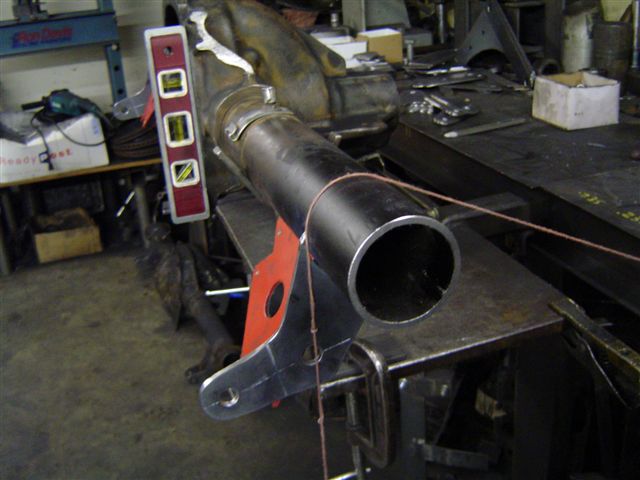
We recommend that you prepare for installing lower brackets onto your axle tubes by first leveling your housing. The setup we use consists of a pair of "V" shaped saddles to hold the axle tubes, along with an RX-7 scissor jack under the housing below the front pinion bearing. The scissor jack works very well for our purposes, as fine adjustments can easily be made. Our goal is to get the housing's rear gasket surface to be "plumb".
 .
.

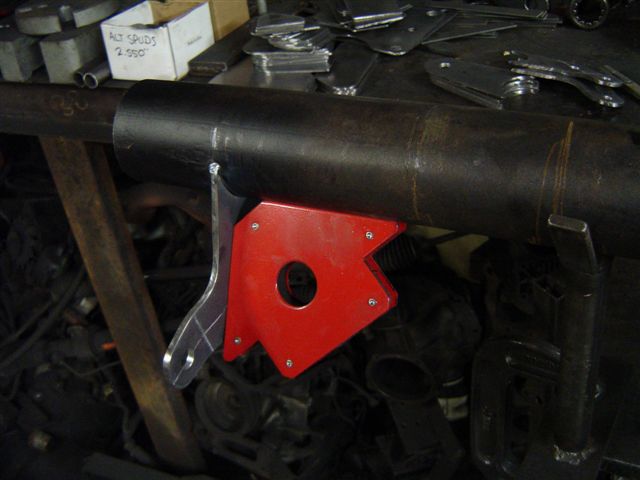
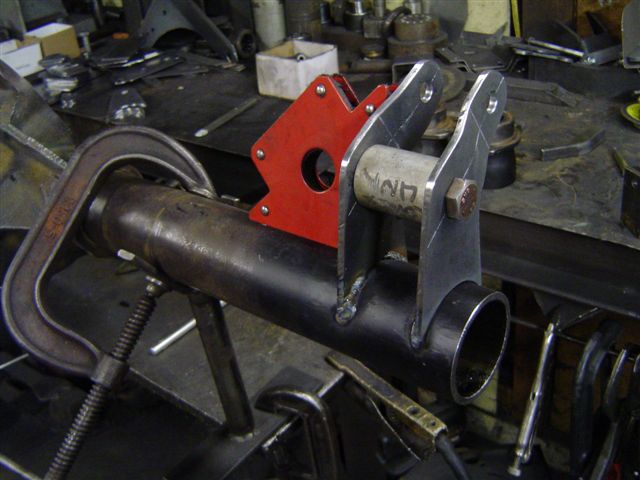
We use a pair of magnetic triangles to hold the brackets in position before welding. Using these allows us to easily measure and re-position brackets as necessary, greatly simplifying the task. Their laminated / triangle shape works very well for this purpose, as their shape automatically squares the bracket with the axle tube and holds it in place prior to tack-welding.
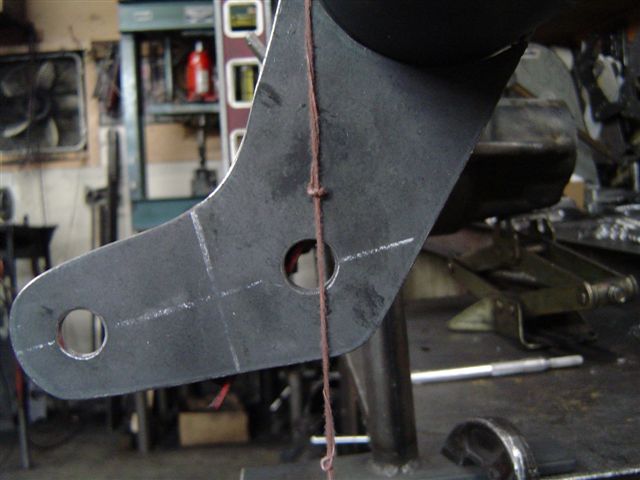
We locate the attachment points for the lower/inner plates next...
The spacing between the lower control arm's rear mounting points does not have to be the same as the appx 42" spacing of the front brackets...we prefer to move the rear points in slightly to appx 40-3/4" c/c width at the rear. This puts the rear/inner mounting plates about 38-1/2" apart, evenly spaced from the ends of the axle housing. Be careful to use a plate that has it's shock mounting hole stepped in the correct direction.
Next, we position the proper location of the lower control arm's rear mounting hole. If your axle tube diameter was 3", the string would pass thru the center of the hole. The axle tubes in the pics are about 2-3/4" dia, so the string is about 1/8" forward of the center of the hole.
......For a 2-3/4" axle tube diameter as shown, the string should be 1/8" forward of the hole's centerline.
......For a 3" diameter axle tube, such as some 9" Ford or 8-3/4" Mopar, the string should be centered with the hole.
......For a 3-1/4" diameter truck/Explorer axle tube, the string should be 1/8" to the rear of the hole's centerline.
 .
.
After both inner plates are tacked into position, the outer plates can be located. We use a machined spacer to position the outer plate properly, but you can easily use a stock rear lower control arm from a 1st gen '70-'85 RX-7 as the spacer, which is what the brackets are designed for. The inner plates/bolt/spacer will now serve to position the outer plates correctly.
With the bolt/spacer still in place, finish weld the outside of each bracket to it's axle tube. We also place a weld appx 1" long on both inside corners of each bracket.
Installing the pivot bracket for the watts linkage...
To position the watts pivot bracket, we position the stud's centerline parallel with the pinion's centerline. The bracket's edge is placed on the axle tube, against the shoulder of the cast diff housing, then welded to the axle tube in 4 places (2 top, 2 bottom).

Installing the sway bar brackets onto the axle tubes...
Positioning and welding axle tube end housings...
We try to wait until the everything else on the housing has been welded before we install the axle tube ends onto the tubes. The reason is that all cutting/welding has at least some effect on the axle tube's straightness. After the rest of the brackets are installed, we use a precision ground bar located off of the diff's side bearing bores to locate and ensure proper alignment of the axle tube ends.
Installing backing plates or caliper brackets...
Use only new 3/8" grade 8 fasteners torqued to 45ft/lbs to secure our caliper brackets to the 8.8 rear.
Housing assembly, final prep, & paint...
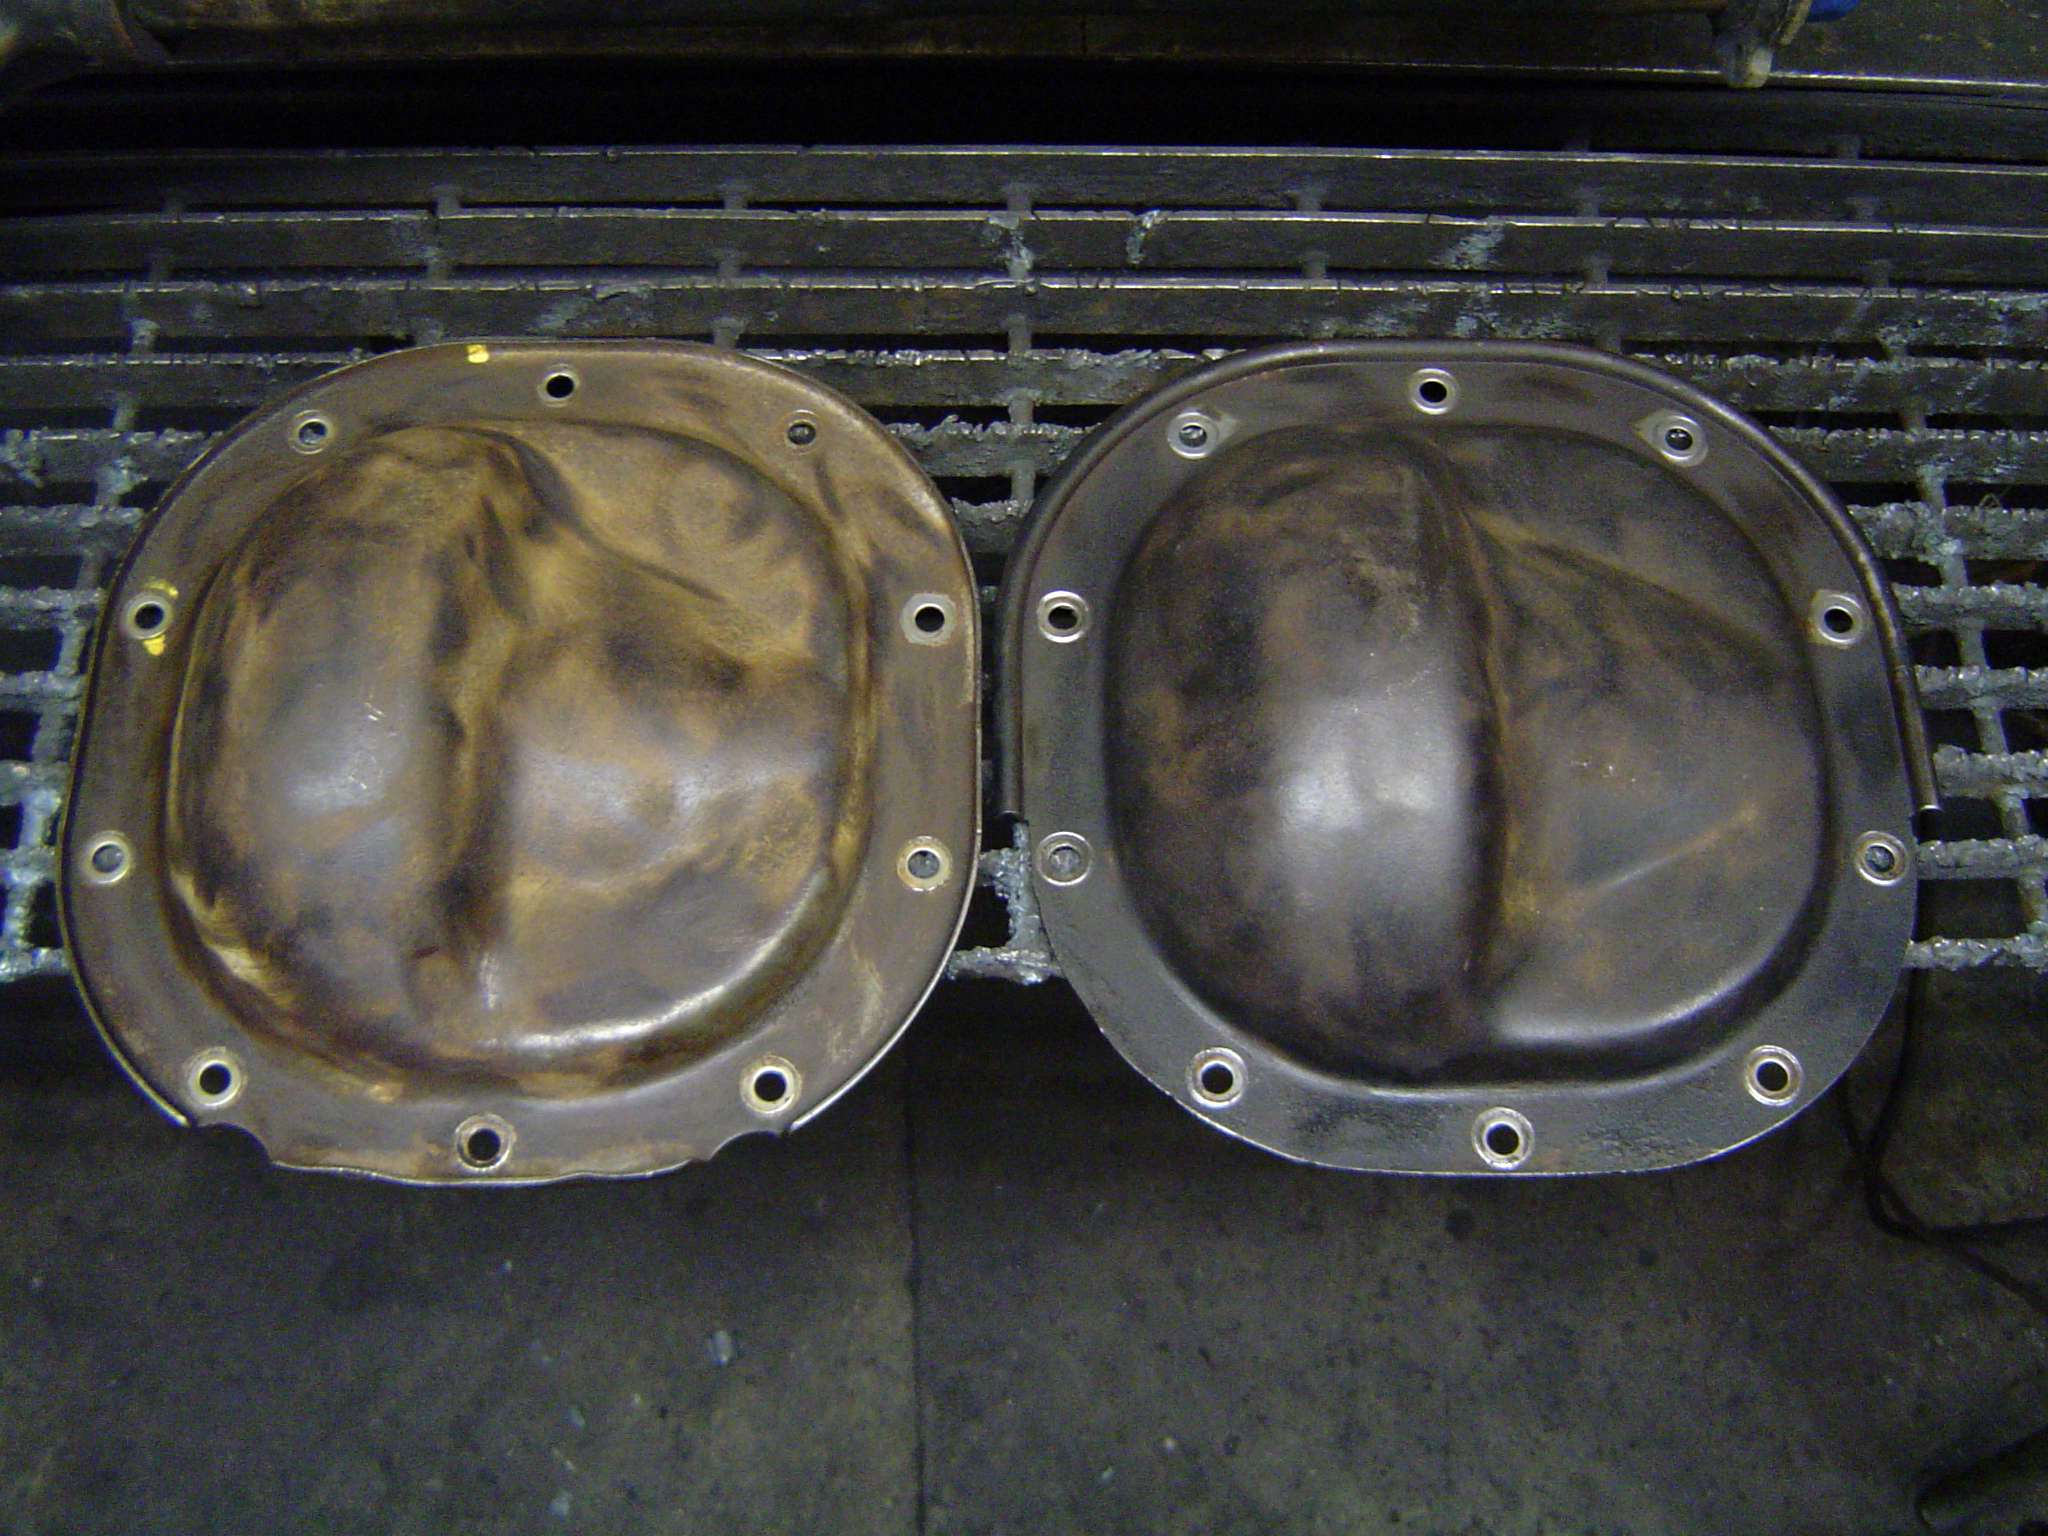
Modifying and installing the rear cover...
Before installing your 8.8's rear cover, it will need to be modifyied to fit properly with the torque arm's rear mounting plate. We use a plasma cutter to quickly trim away the lip from the lower part of the cover's flange, but it can also be ground down with a hand grinder or trimmed w/ an oxy/acytelene torch.
The cover on the left is stock, the one on the right has had it's outer "bead" removed from it's lower half as described above...
If you are installing a chrome rear cover, it's gasket surface should be roughed up so that the sealer can get a proper "bite" on the smooth cover. We lightly sand the gasket surface on a belt sander to rough-up the chrome for a good bond/seal. We don't want the rear cover moving around, causing leaks.
Fitting and installing the Torque Arm...
Our Torque Arms are designed to fit the nose of your differential very closely. It was fabricated and hand fitted to an actual housing in our shop to insure a snug fit. Although not required often, minor differences in castings may require additional hand fitting of the torque arm's front plate. If your torque arm fits too tightly, a few seconds with a die grinder or dremel tool w/ a small carbide cutter will provide a quick remedy.
Installing the Torque Arm's front yoke assembly...

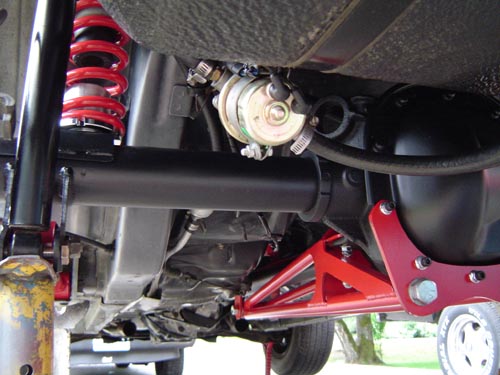
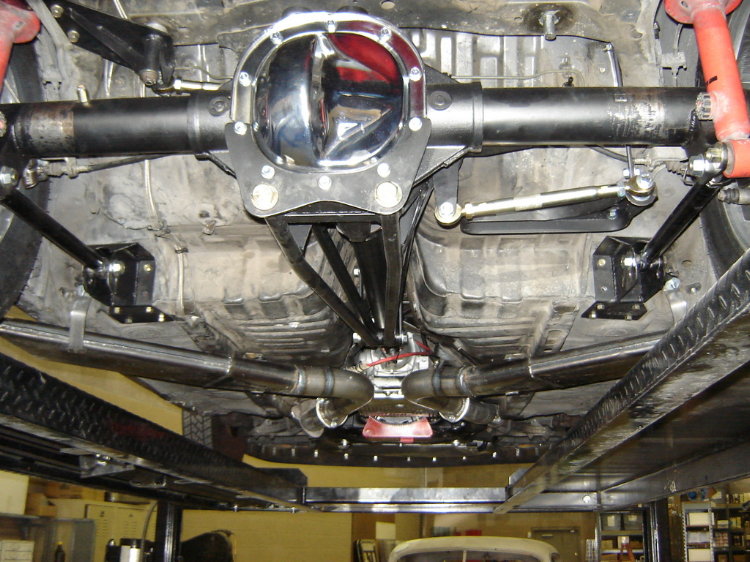
Finally, 8.8 meets RX-7...
Installing the driveshaft...
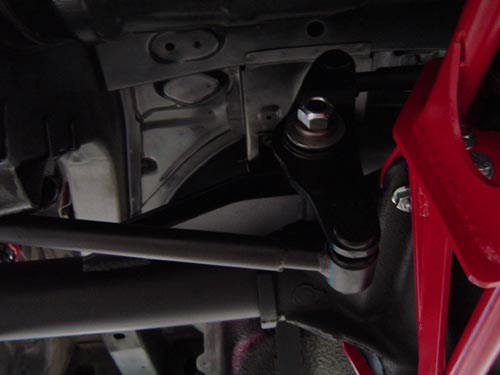
Installing the watts linkage and centering the rear...
If you are using the OEM watts linkage from a '79-'85 RX-7 on a standard width '86-'93 Mustang, your watts linkage's "bars" will need modification to properly clear and center the rear. The easiest way we have found is to simply cut the ends from the oem bars ans add custom "sleeves" to the center to correct their length and offset. We supply sleeves that are bored out to a slip fit over the cut-off ends of the stock bars, requiring only simple welding to complete the modification.
The picture below shows, installed, a stock watts linkage from a 1st gen RX-7. Note that the rods have been sleeved as described above...
If you are using our fabricated watts linkage, the supplied threaded bars are easily adjusted to center the rear under the car.

Installing the brakes and e-brake cables...
Final inspection and safety check...
Periodic inspection and maintenance...
Keep a watch out for oil leaks from your rear, especially from it's rear cover. Not only can a leak cause component damage from low oil level, it also may indicate loose cover bolts that play a critical part in anchoring the rear of your torque arm.