Granny's 1st gen "shop mule"
Granny's 1st gen "shop mule"
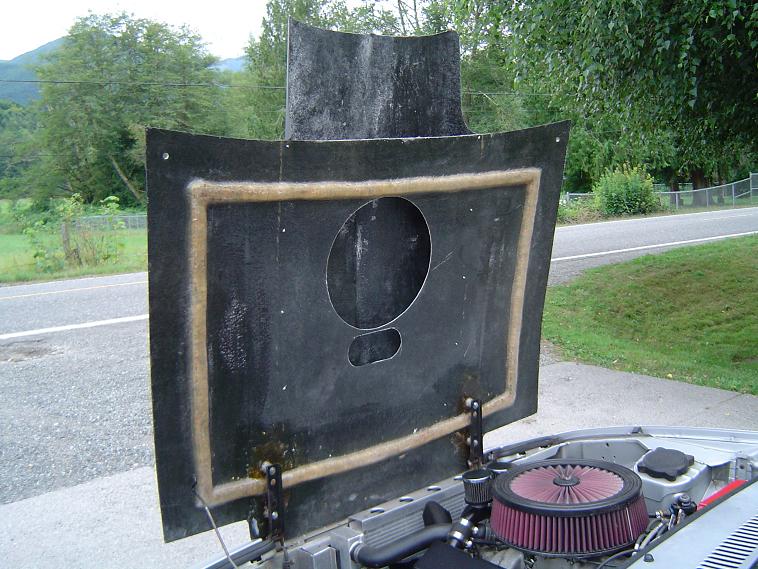
Here's our Shop Mule fresh back from the races with a cowl hood installed. We've had quite a few race cars, but this car is more fun. It can be driven anywhere, at any time. No trailer, no tools, no extra tires...just bring a helmet.
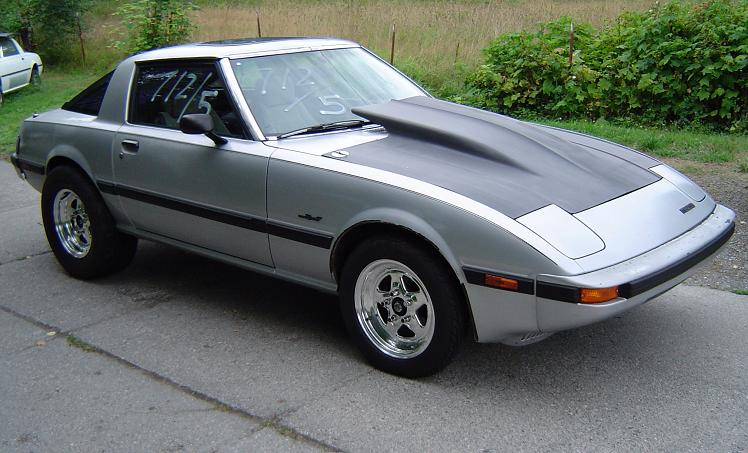
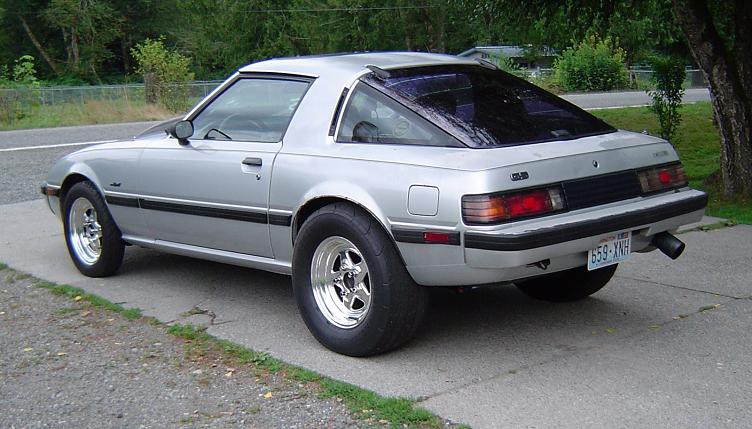
It's still somewhat of a sleeper, and retains a completely stock shell. Everything we did to this car could easily be transferred to another car, as all mods are simple bolt-ons. Hard to tell that we added 90lbs inside that rear bumper.
The hood is a lightweight lift-off version that we converted for use with the RX-7's existing hood hinges. We machined a few threaded aluminum spacers to set the hood off of the hinges the same amount as the stock hood. We then made a fixture to locate the spacers in the correct locations, cut some grooves and notches so that the fibreglass could really grab them, then fibreglassed them on. At the rear, we used custom made hood pins that installed into existing holes that were formerly used to locate the rubber bumper pads in the rear corners. We are making a tray to fit under the air cleaner to seal it to the hood for a true cold air set-up.
The car pictured here has a completely stock body- no wheelwell trimming, no mini tubs, no subframe connectors, no roll bar, and no chassis reinforcements. All upgrades are bolt-ons, including the rearend/Torquearm upgrade. The only (2) additional holes have been drilled in the car, in the top of the transmission tunnel, for anchoring the Torquearm's front yoke assembly. Even the hangers for the exhaust system were made to use existing holes in the chassis.
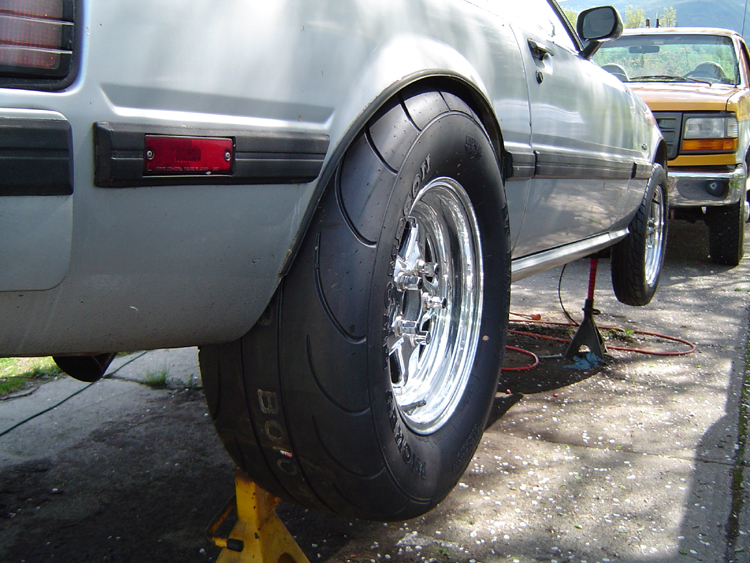
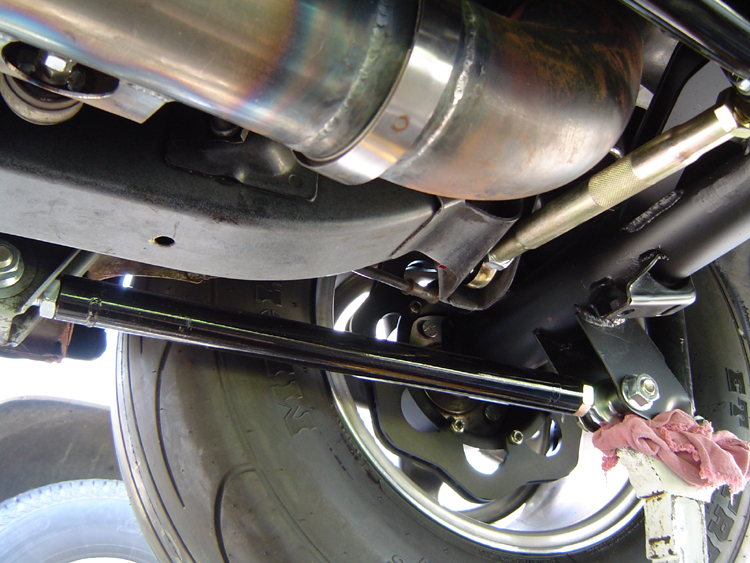
This is the biggest tire that will fit the stock 1st gen RX-7 wheelwells...in this case a 275/60-15 MT "ET Street Radial" that is DOT legal and measures just a shade over 28" tall. There is about 3/8" clearance at the front and rear of the stock wheelwell opening, so don't try this with a bias ply tire that will grow taller at high speeds.
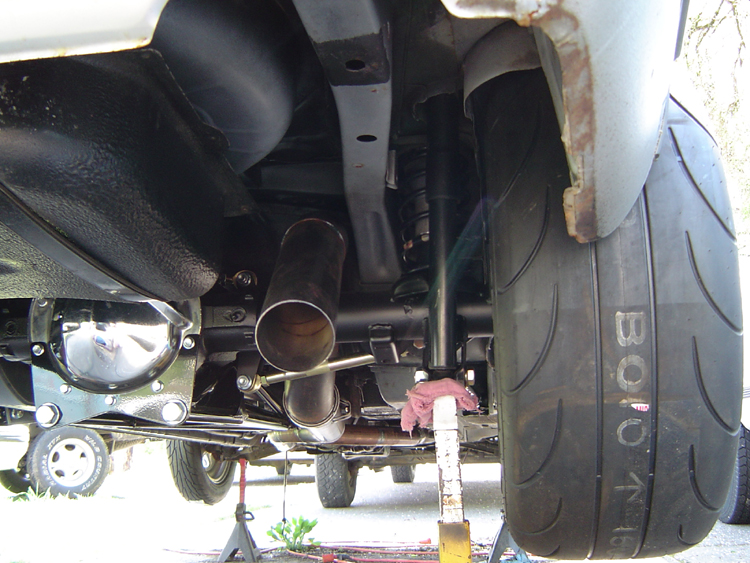
Clearance between the inner sidewall of the tire and inner fender is close at about 3/8", what we would consider the absolute minimum for a car that still has some body roll. The275/60-15 Drag Radials are on 15x8 Weld Prostars with 5.5" of backspace. The 8.5" 10 bolt GM rear axle has been narrowed, and measures 58" wheelflange to wheelflange with the brake rotors/hats installed. The front wheels/tires are 15x3.5" Weld Prostars with 1.75" of backspace. Stock RX-7 front hubs were re-drilled to 5 on 4-3/4" to match the rear.
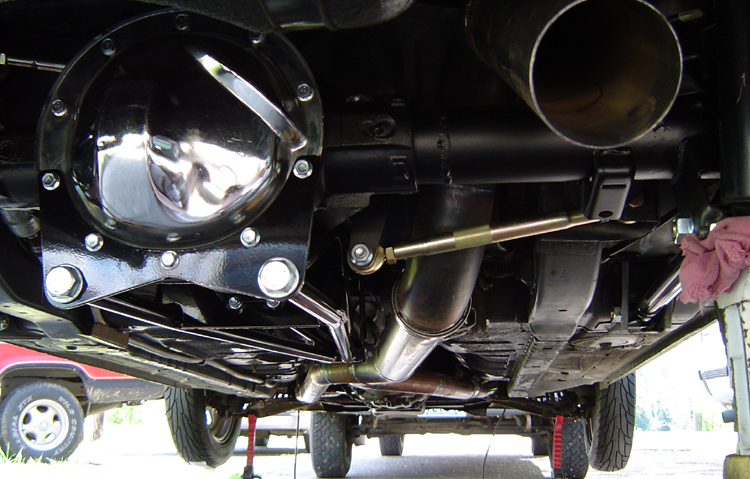
This shot shows our TorqueArm suspension conversion installed, along with our equal length/merged single exhaust system.
We send (2) equal length 2-1/2" pipes from the collectors, and merge them into a single 3-1/2" pipe. FYI, two 2-1/2" pipes have about the same cross sectional area as a single 3-1/2" pipe, but the single 3-1/2" pipe has only about 60% of the surface area (less surface friction). We absolutely love the sound of the single exhaust with the big solid roller cam that the car has. It still has all the lope of a Harley at lower RPMs, but at full throttle, it has a smooth hi frequency scream like an Indy car (not to mention that single exhaust/muffler is quite a bit lighter than true dual pipes/mufflers).
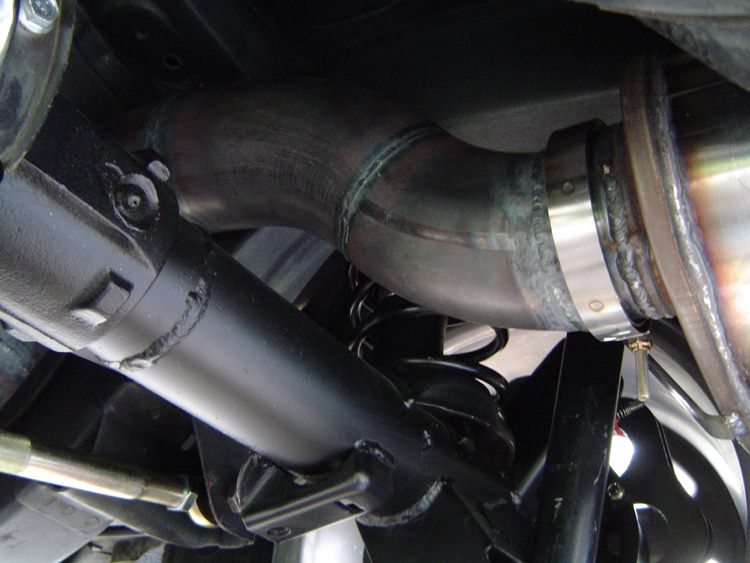
The lowest point of the exhaust system is only 1/2" below the stock 1st gen RX-7 "frame rails", giving us excellent ground clearance when we switch to "road race" mode. V-band clamps are used to allow quick and easy changes during test sessions.
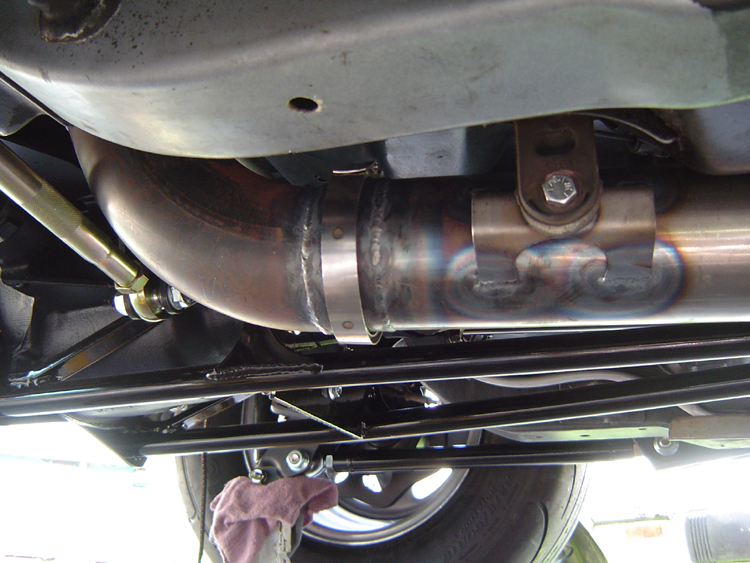
The entire exhaust system is hung with (4) stock RX-7 rubber hangers, 1 here before the axle, and 3 around the muffler. The sheetmetal bracket serves to isolate the rubber from the full heat of the pipe.
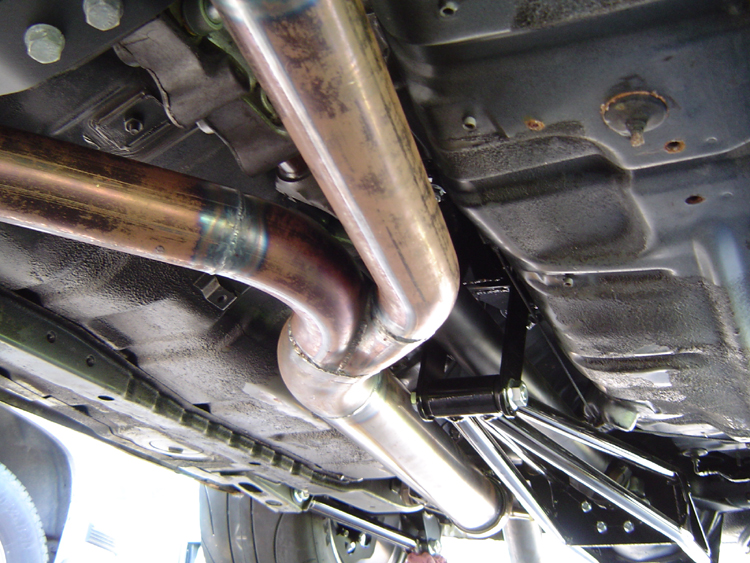
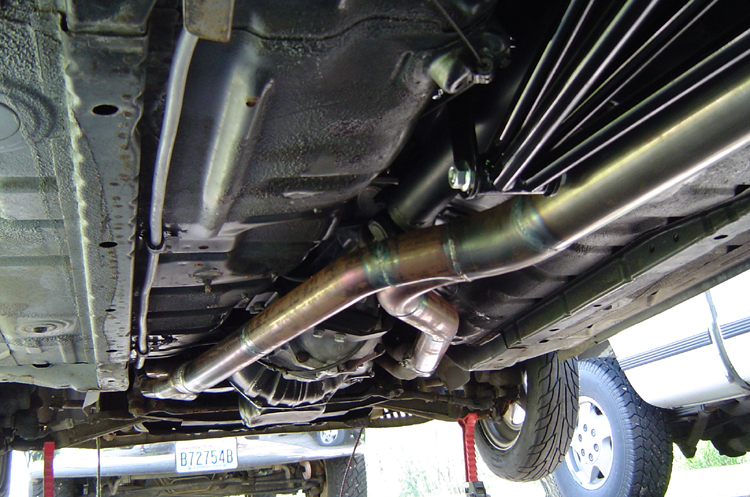
We merge the pipes directly under the driveshaft's tube, the point of maximum clearance just to the rear of the u-joint.
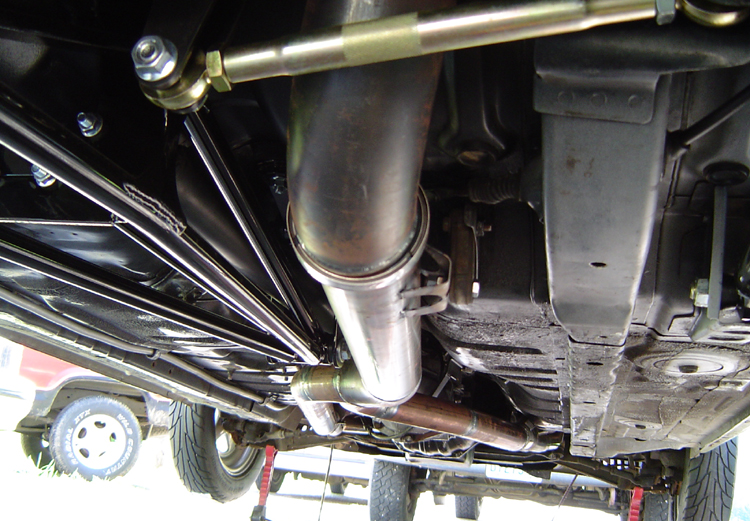
Here's a shot of the clearances around our fabricated watts linkage. The 3-1/2" pipe goes up and over easily, with at least 1/4" of clearance at all points, even with the suspension compressed.
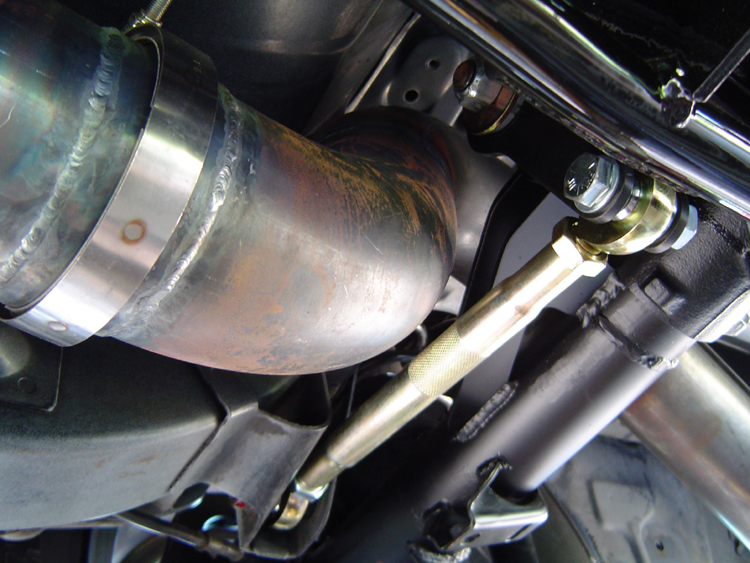
Here we can see our large rod-end style lower links installed. This car also has brackets installed on the rear axle tubes for upper links, allowing us the option of removing or dis-connecting the TorqueArm and going back the stock RX-7 upper links, enabling back-to-back comparisons if needed. We are also experimenting with using the former upper link chassis brackets as anchor points for brake floaters for the rear calipers, which enables us to eliminate or adjust rear brake hop, making the TorqueArm suspension much more roadrace friendly.
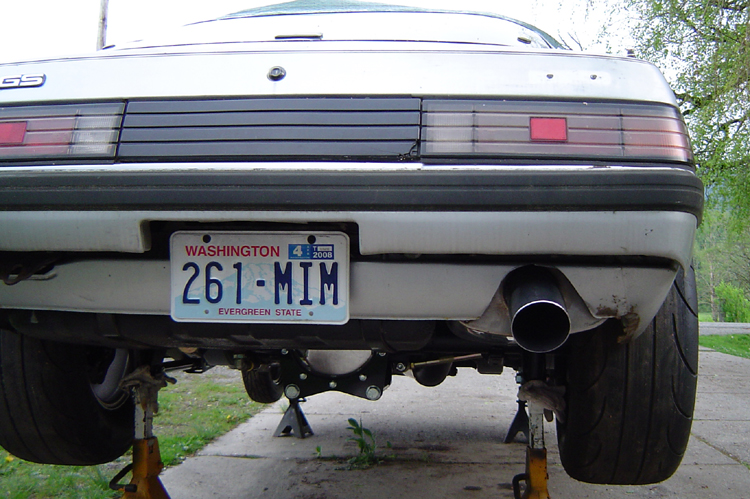
We had to enlarge the exhaust cutout in the rear valance panel. It's pretty easy to do with both right and left-hand tin snips. The muffler is tucked up along side the gas tank, almost completely hidden from view.
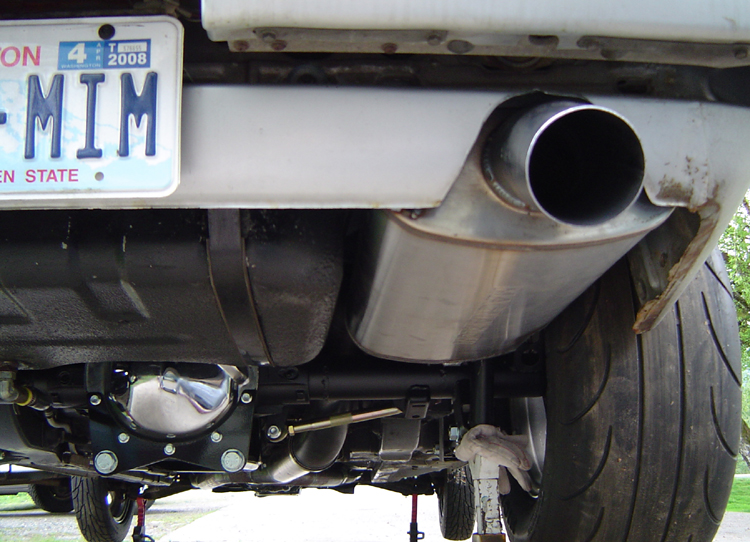
This is about the biggest Magnaflow muffler that we could find. It's 3-1/2" offset in, 3-1/2" center out, 11"x6"x22" oval and weigh a whopping 20lbs. Looks like something that belongs on a Diesel truck. We also installed a smaller 14.5 gal fuel tank from a '79 car and also added a 1/2" bottom outlet. Our '85 originally came with a 16.4 gal tank.
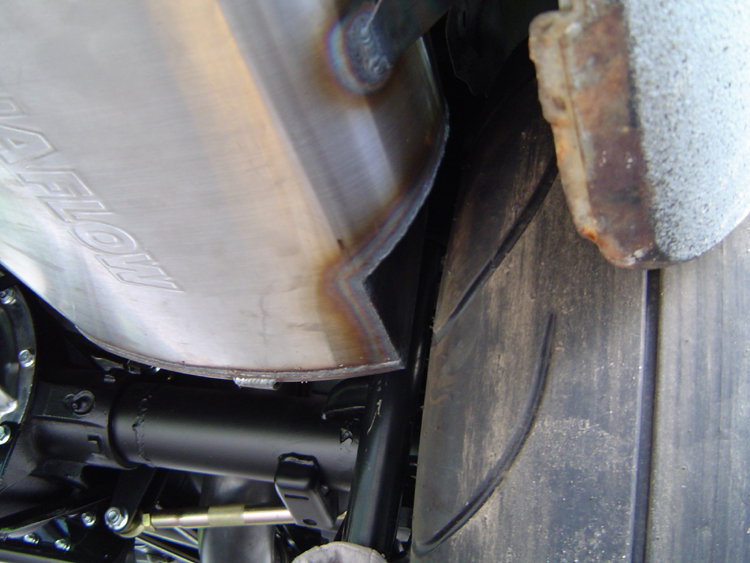
This thing is so big that we had to use 3 hangers and notch it for tire clearance.
We use a v-band clamp here, allowing us to change mufflers easily. We currently have 3 options back here...
...1- Super quite Magnaflow
...2- Custom 2 chamber Flowmaster
...3- Dump pipe (no muffler)
We use the Magnaflow most of the time, as it attracts the least attention, scares less people, and is less likely to generate a police report. We do a lot of our testing on local country roads, and like to stay as discrete as possible.
Initial testing of our Torque Arm conversion for the '79-'85 was done using stock RX-7 rear springs, which have a soft 101 lb/in rate. The soft stock rear rates are better suited to very low traction surfaces, but it quickly became apparant that stiffer rear springs are needed, even for average un-prepped conditions that you might encounter on the street. We recommend at least 175lb/in for poor conditions, and all the way up to 275lb/in or more for a hooked track. The difference between the stock springs and 175lb springs can be .1 or more on your 60'. With a soft spring, topping out the rear suspension can be a problem, as the rear of the car can quickly rise, abruptly use up it's travel, unloading the rear tires as they are jerked off of the ground. The result can be a cycling "bounce", similar to wheelhop. The goal is to get the suspension working freely and smoothly using it's range of travel, without either topping or bottoming out. Use as much of the available travel as needed to stick the car, in as smooth of fashion as possible.
For the rear of the 1st gen RX-7, we use 5" od x 11" tall coil springs designed for circle track applications. These are common, cheap, and come in many different rates. The downside is that they are slightly larger dia and require minor modification to work with the stock RX-7 spring seats. Both ends of these springs come ground flat, while the stock RX-7 springs were not.
To fit the '79-'85 RX-7's upper rear spring seat... simply eliminate the stock "stepped" rubber isolator ring, allowing the spring to contact the flat upper seat.
To fit the '79-'85 RX-7's stock lower rear spring seat... simply trim 1/2 of a coil from the lower end of the spring, creating a helix that closely conforms to the shape of the RX-7's lower seat.
We prefer the larger stock springs over the small diameter 2.5" id springs and threaded adjustable seats, as it allows for using a taller spring. If adjustment of corner weight or "pre-loading" is desired, simple flat rubber or metal spacers can be installed in the upper spring seats.
Rates available in 11" tall/5"o.d. springs from Eibach range from 125lb/in to 450lb/in, in 25lb increments.
Machined aluminum bumpstop extensions can be seen inside our rear springs, which we added to insure that the wheelwells cannot contact the tires, even if a lot of rear ballast is added. Easy to fabricate, they are 1-1/2" dia round solid aluminum, 1.9" long, w/ a hole bored thru the center, attached using a longer bolt.
Another important asset for tuning your rear suspension is adjustable rear shocks. Since we don't know of any double adjustables that fit, we like Tokico's Illumina 5 way adjustable PN# BE 2317. They fit the RX-7's stock mounting points and with their adjuster dial located on the end of the upper shaft, adjustment is easily accessible from the top by raising the rear hatch glass. As a general rule of thumb, if you car responds favorably to a stiffer "5" shock setting, there's a good chance it will respond to a stiffer spring.
As a tuning aid to help quantify your efforts, we recommend using the Gtech Pro SS (available from Summit or Jegs for around $199). It can record up to 30 runs at a time, which can be downloaded to your PC for comparison. It will do all the horsepower/torque calculations, 60', 1/8mi et/mph, 1/4mi et/mph, 0-60 etc, but more useful are the RPM, speed, and "G" run comparison graphs. Make a change on a run and choose a previous run to compare it to, laying one over the other. Up to 4 runs can be compared at a time, making it very easy to see where gains or losses occurred. All that's required to get launch info is at least a 60' run, making it possible to gain useful tuning info without exceeding the speed limit. Does one tire work better than another? Did dropping to 12psi really help? Stiffer or softer on the shocks? find out quickly and easily, without going to the track, with a Gtech.
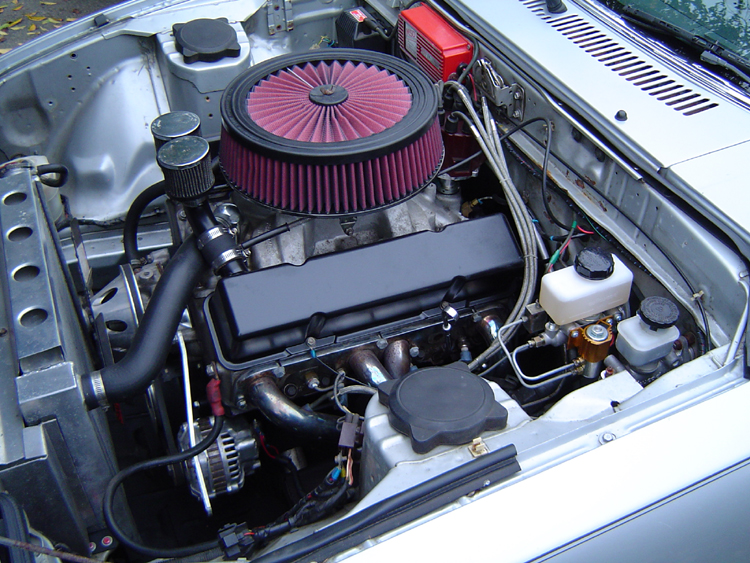
This car was built mainly as a street legal test mule. It is completely street legal, retaining heater, wipers, lights, full stock interior and real glass. Driven everywhere it goes, it's never been on a trailer as long as we have had it. Power comes from a flattop 357 Chevy attached to a non-world class 6cyl T5 from a Camaro/Firebird. The engine has an edelbrock Performer/Carter 625 carb along with 1-5/8"x2-1/2" headers, and runs on a strict diet of common pump gas. The solid roller provides .657" lift, 268/275 duration, on 106 lobe centers. Completely NA, no power adders at all. A 17lb SFI steel flywheel, Ram pressure plate, and stock lining on an Advance Adapters disc inside a liteweight stock aluminum bellhousing. Completely stock un-molested body and wheelwells, no rollbars or mini tubs. The car weighs 2720lbs, including a full tank of gas and a 200lb driver. The narrowed 8.5" 10 bolt GM rear has a PowerTrax locker in an open carrier, and is fitted with 3.73 gears. Full exhaust flowing thru a big muffler. In all, a pretty low-profile combination of parts that work pretty well together for their intended purpose. With the small manifold and carb keeping the velocity up, the cam pulls much smoother from the bottom, allowing us to launch at lower RPMs without creating a traction killing power surge. On the street, typically launched at around 1000-1800rpm depending on conditions, it's good for mid 10s at around 130mph. Even without a burnout and on a common unprepped asphalt road, it is still good for 105mph in the 1/8mi with a 1.8 60'.
We also have an optional rear bumper with 95lbs of lead added to the inside, completely hidden. The stock RX-7 bumpers attach from the outside using 2 simple "pin" bolts, easily accessible from the bottom side thru two round holes in the underside of the bumper cover. The bumpers take only a few minutes to change, but the added weight requires us to add spring shims to the rear springs to retain the same ride height. Removing the rear springs to add the shims requires jacking up the car and removing the lower shock bolts for access, a process that takes about 10min to complete. On an un-prepped surface, the added 95lbs reduces the 60' to around 1.69-1.71.
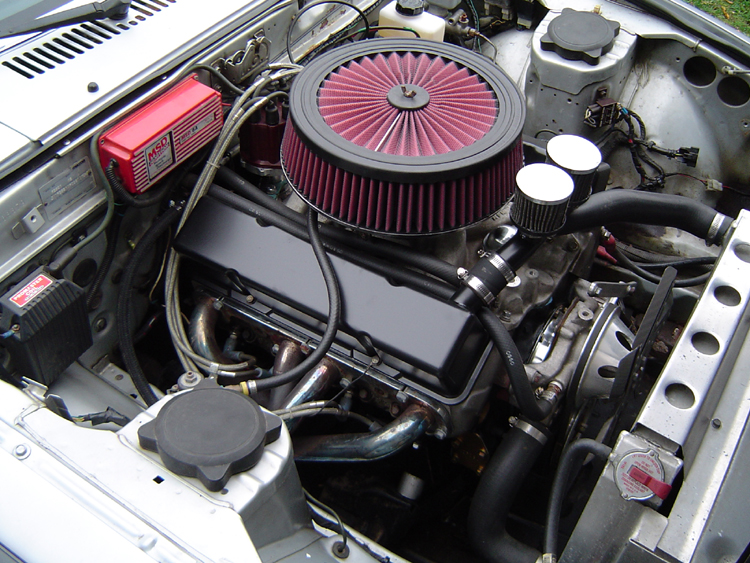
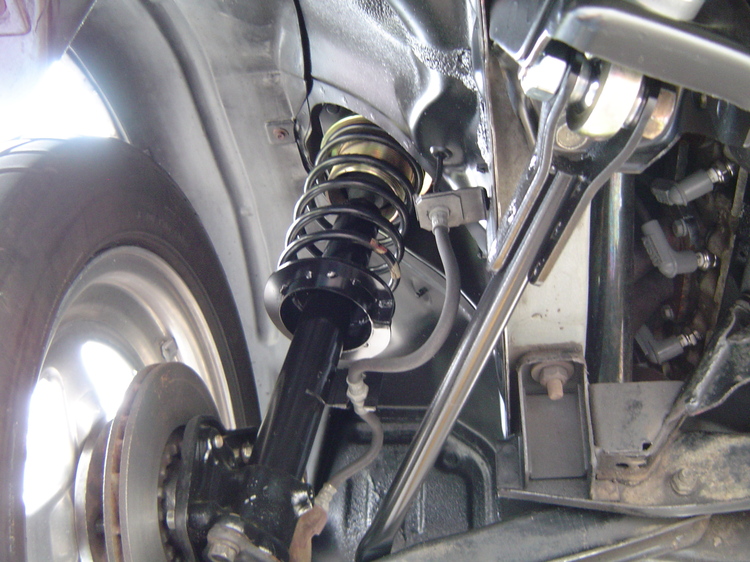
From here you can see a few things we did to save weight up front...we made a plate to convert to manual brakes (no more brake booster), eliminated the headlight motors, and removed the front sway bar. The plastic 2nd gen covers on the top of the strut towers hide the fact that the upper strut mounting hardware has been spaced away from the underside of the tower, allowing the front of the car to rise higher under acceleration.
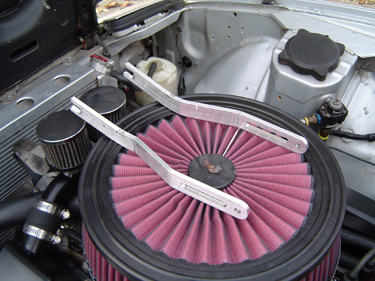

For the trip back home after the races, we made a couple of liteweight aluminum straps that we can quickly install that serve to hold the headlights in their upright position. They attach to the lower stud that formerly held the headlight motor in place, using a wingnut for installation...no tools required. A functioning heater is also nice to have on the way home, no need to keep wiping the fog from the windshield.
Our 6cyl T5 has taken some amazing abuse. Other than a B&M Ripper shifter, all the internals are the originals, although some have been modified. We converted it to a crash box in 2nd and 3rd gears (some call it "pro-shifted"), eliminating their synchro teeth, but leaving 1st, 4th and 5th with old school syncros. The sliders and engagement lugs for 2nd and 3rd were also modified by removing every other tooth, effectively tripling their window for engagement. The original 6cyl 14 spline input shaft remains, requiring use of an Advance Adapters' conversion disc designed for the S-10/V8 swap. Part of the reason all this works is that we use a stock style disc that damps the shock loads with it's organic lining and spring damped hub. We also use a lite steel SFI flywheel that further reduces the stored energy that gets dumped into the drivetrain, and a RAM lightweight circle track pressureplate, all in an effort to stick the stiff sidewalled MT Drag radials on un-prepped surfaces. The modification to 2nd and 3rd gears vastly improved shift speeds (worth about .5 sec in the 1/4), and all but eliminates missed gears. There was no need to modify 1st gear as we were shifting out of it, and the synchro allows the trans to easily be put into 1st gear with the engine running if our pedal stop is adjusted tight. 4th and 5th gears also keep their synchros to make them more friendly for highway driving. We love the way the transmission shifts with it's hybrid mix of street and race modifications, and would recommend them for dual purpose cars. We run thin synthetic Mobil 1 engine oil in it. The non-world class box also uses straight bearings on it's countershaft and a conventional thrust washer, eliminating the need for an aftermarket retainer to deal with the increased thrust loads of the tapered bearing equipped world class boxes. We originally did the crash box thing as an experiment to see if it might be worth building a dog ring T5 w/ a set of G-Force gears and case. I'm sure we will install the G-Force stuff eventually, but we can't resist seeing how far we can take this junkyard box.
UPDATE-...We found the non-worldclass T5 to be very reliable for our application, until we reached the high 6's in the 1/8mi. At that point, the teeth on 3rd gear last only a few runs. The WC boxes seem to reach the same threshold at around a 7.15 et. The Torque Arm suspension is likely key to getting that much out of the relatively weak T5.

Our favorite metal skull shift knob was hollowed out and fitted with a switch for the lineloc. The momentary switch came from Radio Shack, 2 to a pack, for a few bucks, as did the 14ga hookup wire. A large deep hole was bored up from the rear of the skull's base for the switch. A smaller hole was drilled up in the front under his chin, deep enough to meet the rear hole at a point above the shifter threads. Wire was fed in from the chin hole, up over the threads, and out thru the large rear hole. The ends of the wires were then soldered to the switch. Before pulling the wires back thru to seat the switch, the interior cavity was filled with silicone, which provides protection against an internal short. After the switch was seated, the wires were tested to make sure the switch was working and that there were no shorts. After that, a 2 pole "Dean's Connector" (get 'em at the RC shop) was added about 6" below the switch (below the boot) so that the wires can be quickly disconnected when the shifter or transmission are removed. The little Deans Connectors are great, ultra lite and good for 35amps or more, we use them for fuel pumps and ignition boxes too.
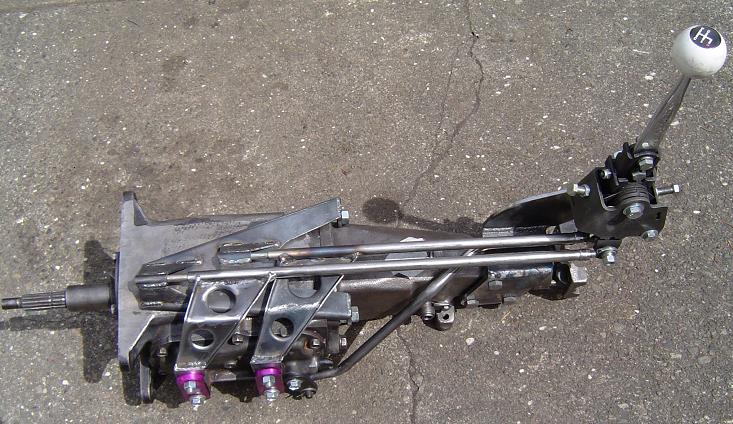
Here's an experiment...we pro-shifted 2nd and faceplated 3rd gear in a Saginaw 4spd, then designed a hybrid "rail" style shift linkage to make it fit the RX-7's stock floorpan and console...it requires no chassis or tunnel modifications for installation. The shifter sits up over the center of the output shaft, and fits the RX-7's interior console and boot perfectly. Current updates included replacing the guide plate that attaches to the top of the main case with two lighter aluminum female rod ends located by simple holes drilled/tapped into the top of the case. The Hurst SuperShifter stick was also shortened slightly to put the shift knob in the perfect spot.
Why did we choose a Saginaw instead of a Muncie?..available 1st gear ratio to go along w/ our 3.73 rear. The Saginaw has a 3.50 1st gear vs the Muncie's lowest available 2.52, providing a much better 13.05 overall ratio for launch (the Muncie would provide only a 9.39 overall gear). We really miss the T5's overdrive at 70mph on the freeway, but it became less than reliable whenever 90lbs was added inside the rear bumper. After driving home 85 miles from the strip 4 different times with a T5 missing 3rd gear (thank god for that big magnet in the bottom of the T5), we had to make a change. Another thing to consider is that the Saginaw 4spd is pretty easy to find for around $75.
Going down the hiway in 4th, with the Saginaw we do 2500rpm @ 55mph, and 3175rpm @ 70mph. The T5's 5th gear overdrive knocked the rpm @ 70mph down to 2325rpm. Unless you really need the extra strength, the T5 is a great choice.
We spent several hours cutting and grinding on the cast-iron Saginaw, lightening it up to the point that the complete Saginaw trans/shifter package weighes only 12 lbs more than the all aluminum T5 trans/shifter package that it replaces. The gears are quite a bit wider than those inside the stock T5, and the pro-shift mods we made to the sliders and dog teeth makes shifts almost effortless. This is a key point to making the Saginaw live, as it's shift fork design is a bit weak.
The clutch uses a 3/4" Wilwood master cylinder, and a stock RX-7 slave cylinder, mounted on the bellhousing using one of our slave brackets. The throwout fork is one of our shortened units, and a Lakewood adjustable fork pivot was used to optimize the throwout fork / release bearing geometry. The results are well worth the effort.
The car runs well into the 6's in the 1/8mi using this transmission/shifter, with no failures to date.
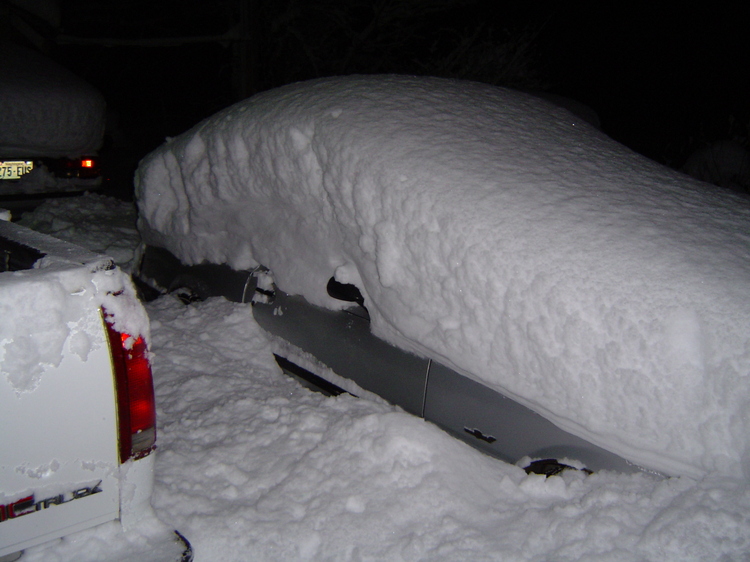
Any doubt it's a street car?
2009 Updates...
...Changes to the front suspension for the drags...
1...The 1st mod was re-valving the 1st gen RX-7's stock front struts to 90/10. This is only possible with the original front struts, which are rebuildable. Many 1st gens have already been converted to cartridge style strut inserts, which are not suitable for our purposes.
2...The 2nd mod basically allowed moving the RX-7's softer rear coil springs onto the existing front struts. The RX-7's stock front springs are rated at 121 lbs/in, while the stock rear springs were quite a bit softer at 101 lbs/in (12-3/4" long). Springs this soft are hard to find in a size that fits the RX-7's strut. What we have done is make a set of spring adapter seats to make the switch possible. The lower adapter seat simply slides over the strut and onto the existing seat. The new upper seat uses a threaded sleeve and is adjustable, making it easy to get the perfect ride height while using the softer springs.
3...The 3rd mod involved spacing the strut's upper mounting plate down and away from it's 4 bolt chassis mounting point at the top of the strut tower. Normally, the amount of possible change is limited to about 1/2" by the length of the studs on the upper mount. What we have done is to make a set of threaded spacers that screw onto the studs, allowing the front-end to rise up to 2" more during launch.
4...The 4th mod was modifying the front strut rod's front attachment point for more movement. The stock rubber bushings are very restrictive, actually resisting full suspension drop. We converted the strut rod's front bushings to rod-end style connections, allowing an almost unlimited range of motion.
5...Added adjustable tie-down straps to the front suspension.
...Changes to the rear suspension for the drags...
Besides converting to our Torque Arm rear suspension, we also made the following changes...
1...The first change involved extending the rear bump stops. This mod allows using the largest possible rear tire in the stock wheelwell, and prevents it from contacting the fenderwell's lip.
2...The second change is a new threaded/adjustable upper spring seat. This makes it easy to maintain the perfect rear ride height while changing spring rates and adding/removing ballast.
3...The third change was moving back to the softer rear springs.
......if you have stock front shock valving (poor weight transfer)...we suggest 175lb/in(slick track) or 225lb/in (good track)
......if you have 90/10 front shock valving (good weight transfer)...we suggest softer 100lbs/in (stock rate was 101lb/in)
4...The fourth change was to install adjustable rear shocks.
5...The fifth change was to add a stiffer rear sway bar. With our tires almost completely filling up the rear wheelwells, excessive body roll due to soft springs and no front sway bar is not a good thing. For the shop mule, we heated and slightly re-bent a rear sway bar from the rear of a Crown Vic. The larger diameter bar required re-using the rubber mounting bushings from the RX-7's discarded front bar, but the bar was nearly a direct bolt-in.