

ClutchTamer Musclecar Version Install Guide...
ClutchTamer Musclecar Version Install Guide...
Pre-Installation Requirements...
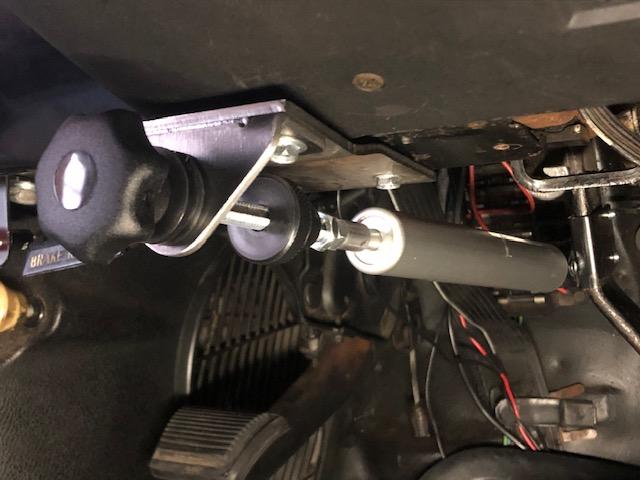
The Musclecar version will look much like this when installed. This pic shows the Musclecar dash bracket mated to an owner fabricated adapter bracket. Not wanting to drill any extra holes in his nice original car, this owner made an adapter bracket from flat 1/8" thick steel plate that attached to existing holes in his dash substructure... ..
IMPORTANT- you must have an effective clutch pedal stop in place BEFORE you install the ClutchTamer! A very important part of getting consistent launches is to have in place a properly adjusted clutch pedal stop. It's function is to insure that the slipper's rod is always pulled out exactly the same amount every time the car is staged, so that it can consistently delay the clutch's lockup.
It's a universal kit so the big thing is to mock it up first. Just clamp the pedal bracket onto the pedal temporarily with a small clamp or vice grips, which allows you to easily move it to optimize geometry. You want the threaded rod to slide thru the dash bracket close to 90 degrees, which means you will likely need to change the angle of the dash bracket's bend. Most of the bend line is severed, which makes it easier to change the angle to suit your application. When the angle is correct, the rod should slide thru the bushing without binding as the pedal swings thru its arc.
The slide bushing in the dash bracket comes with a temporary "cut" retaining washer installed, which allows you to easily remove the slide bushing to change the angle or paint the bracket after the install angle is finalized. The small parts bag contains a washer that does not have the cut, using that one for the final install will keep the slide bushing from rotating in the dash bracket.
You will likely also need to trim the length of the threaded rod for the final install. Leave the rod full length for the mock-up phase, the plastic knob has a little cover in the center that will pop out and allow the rod to pass thru. There is also a jam nut included in the small parts bag, you can use that to temporarily keep the plastic knob from spinning on the shaft during mock-up.
After you are convinced the angles are right and everything works as it should, you can trim the length of the threaded rod. Be sure to trim the end that does not have the detent groove milled into it. The grooved end is needed for the detent balls, which keep the shaft from rotating due to vibrations.
If you want to eliminate the jam nut for final install, you can instead use a drop of Loctite to keep the plastic knob from spinning. With the threaded rod cut to length, you can pop the plastic knob's center cap back in place.
The small parts bag also contains extra o-rings and detent balls, things that may ruin your day if lost.
Initial Setup & Tuning...
...CLICK HERE to go to our "initial setup & tuning guide