
Clutch tuning is all about INERTIA MANAGEMENT. Specifically, managing inertia flow out of the engine's rotating assy during launch and after the shifts. These inertia discharges are seldom discussed in detail, likely because in the past there has been no practical way to quantify them or their effects on the car. This article is intended to change all that, to help racers comprehend what's really going on inside their bellhousing, and then to show how they might use that knowledge to make their car more efficient.
It's important to note that any time an engine is gaining rpm it's rotating assy absorbs some of its torque, which in-turn reduces its net torque output...
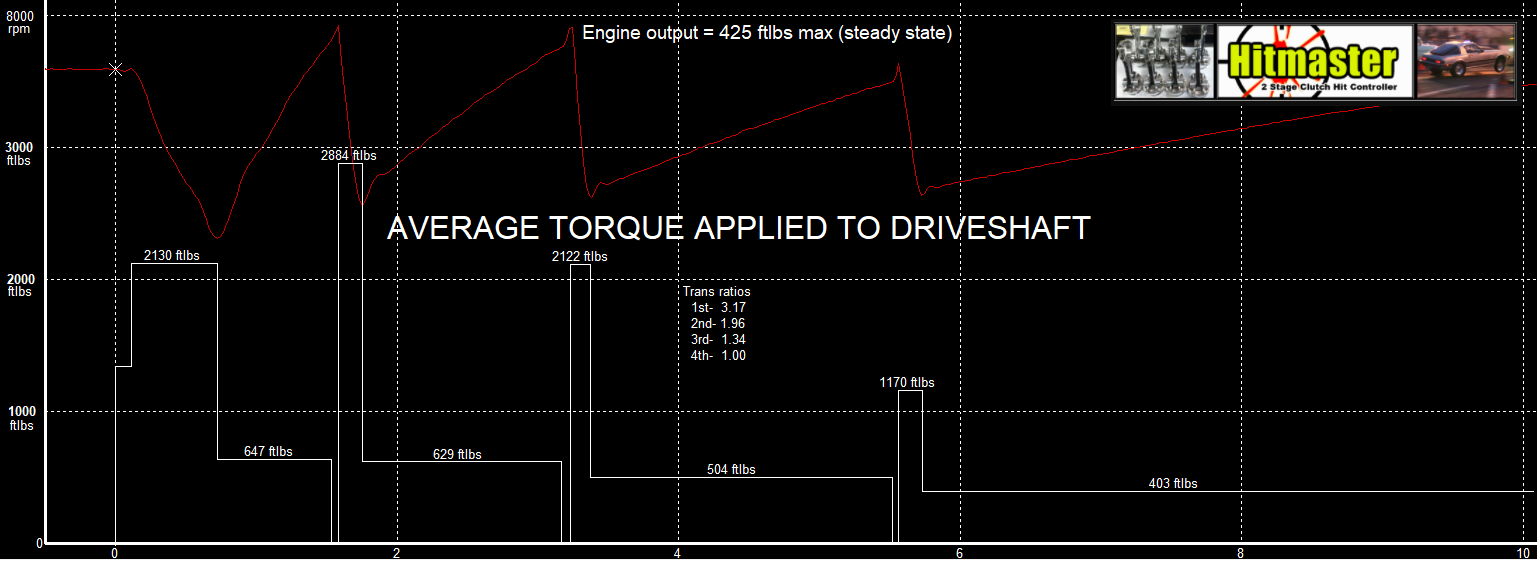
Let's say the engine in our example graph makes a maximum of appx 425ftlbs of torque operating WOT steady state in the heart of its torque curve, that WOT 425ftlb maximum number was our baseline for calculating torque applied to the transmission's input shaft...
...If the engine is operating WOT steady state, 100% of its torque production is available to be measured by a dyno's torque absorber.
...If an engine is accelerating at its maximum WOT no-load rate, it will have ZERO torque output, as the rotating assy itself is absorbing all the torque.
Bottom line is the faster an engine's rotating assy gains rpm, the less net torque that engine will have left over to do actual work. The reduction of net engine torque might be relatively small in high gear where the acceleration rate might only be 350rpm/sec, but you will see a huge reduction of net engine torque at 3700+ rpm/sec 1st gear acceleration rates.
Here I added a binary trace showing calculated torque numbers, averaged amounts of torque delivered to the transmission's input shaft by the clutch. Notice that 3rd gear got the most abuse...
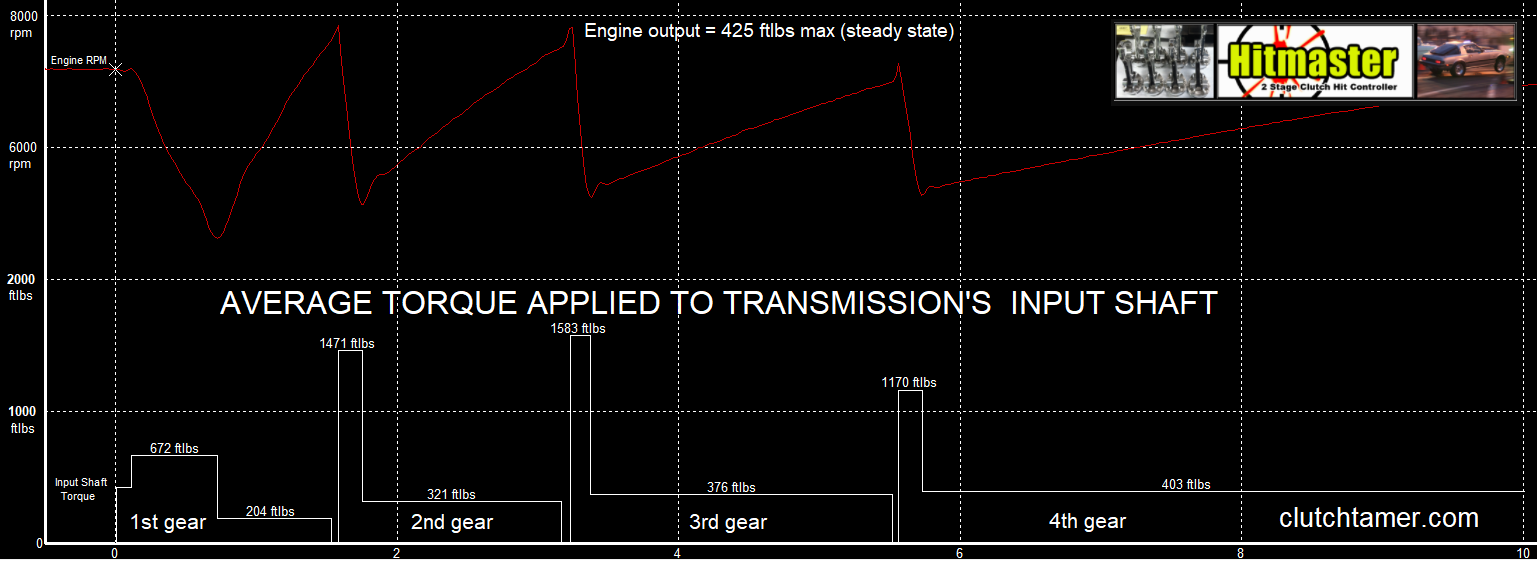
I'm always amazed at how many guys don't want their clutch to slip after the shifts. An aggressive clutch can easily kill a transmission, just look at that 1471ftlb 2nd gear and 1583ftlb 3rd gear torque spikes!!! But that alone doesn't tell the whole story. Here's another graph of that same pass, but this time torque at the input shaft is multiplied by the transmission ratios...
That spike after the shift into 2nd is the kind of thing that breaks u-joints and ring/pinion sets. This clutch needs it's base/static clamp pressure reduced, which would in-turn decrease the inertia draw rate after those "clutchless" shifts. Adjust/shim it enough to increase the 1/2 shift slip time from 0.163sec to around 0.220sec, torque applied to the driveshaft during 1/2 pull-down would decrease to roughly the same level as launch. If you shift using the clutch pedal, an alternative to shimming the pressure plate is to install a ClutchTamer which can add a little slip after the shifts.
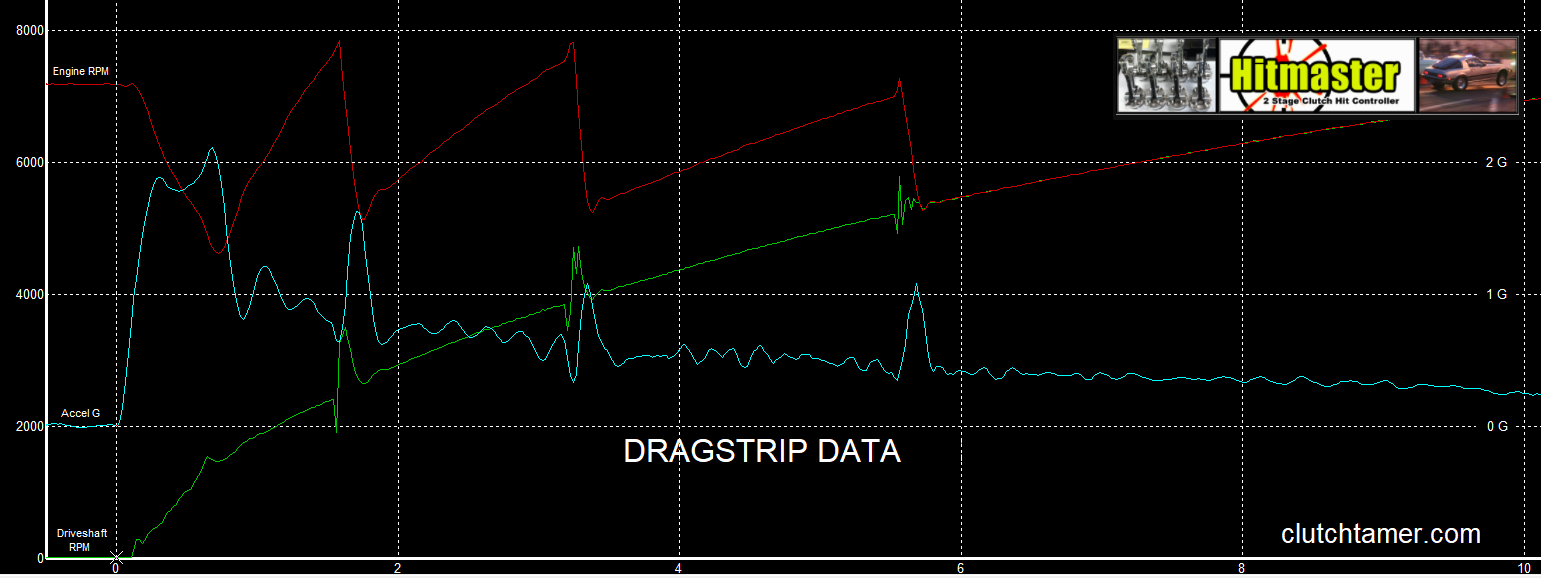
Up to this point you might be skeptical of just how accurate these calculations might be, but notice how closely the above calculated average driveshaft torque numbers align with the pass's AccelG trace...
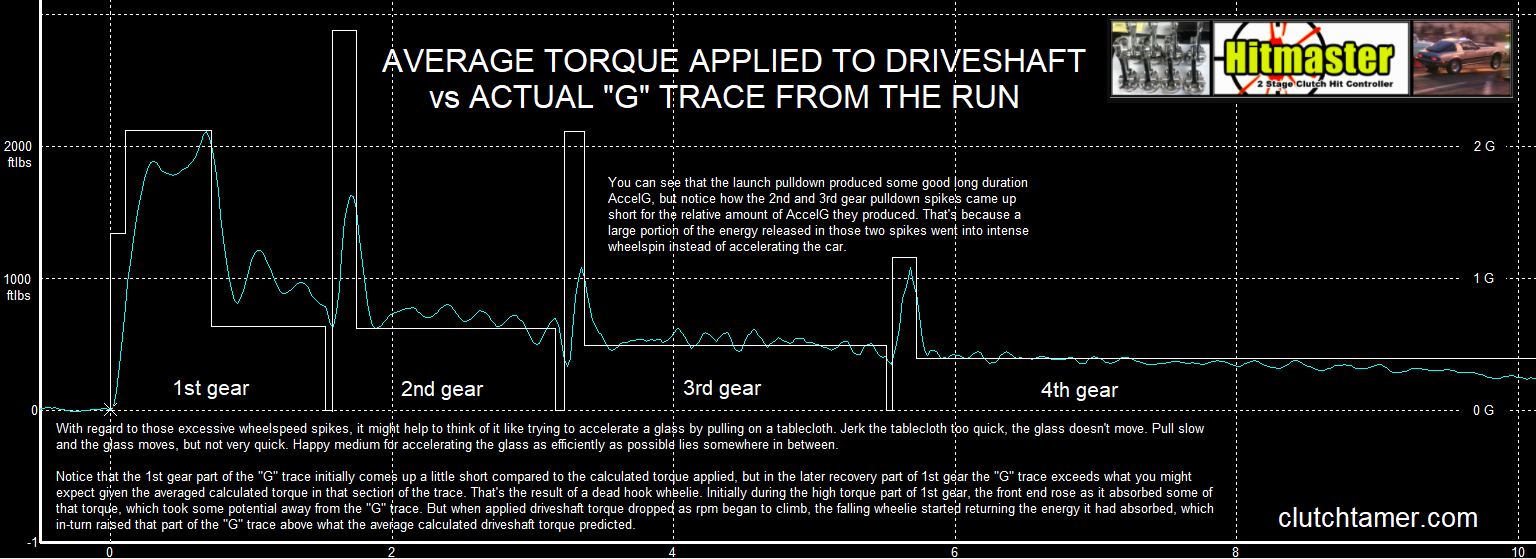
You can see that the launch pulldown produced some good long duration AccelG, but notice how the 2nd and 3rd gear pulldown spikes came up short for the relative amount of AccelG they produced. That's because a large portion of the energy released in those two spikes went into intense wheelspin instead of accelerating the car.
Might help to think of it like accelerating a glass by pulling on a tablecloth. Jerk the tablecloth too quick, the glass doesn't move. Pull slow and the glass moves, but not very quick. Happy medium for accelerating the glass as efficiently as possible lies somewhere in between.
You might also notice that the 1st gear part of the "G" trace initially comes up a little short compared to the calculated torque applied, but in the later recovery part of 1st gear the "G" trace exceeds what you might expect given the averaged calculated torque in that section of the trace. That's the result of a dead hook wheelie. Initially during the high torque part of 1st gear, the front end rose as it absorbed some of that torque, which took some potential away from the "G" trace. But when applied driveshaft torque dropped as rpm began to climb, the falling wheelie started returning the energy it had absorbed, which in-turn raised that part of the "G" trace above what the average calculated driveshaft torque predicted.
With any hydraulic clutch hit control system, how much fluid is allowed to initially return when the clutch pedal is released is what determines where the throw-out bearing actually lands during launch. Where the throw-out bearing lands during launch is what controls how much clamp pressure gets applied to the clutch disc during launch. How much clamp pressure gets applied to the clutch disc during launch is what determines how long it takes for the clutch to lock up. After the car has gained enough speed to allow clutch lock-up, the clutch hit controller turns off which in-turn allows the throw-out bearing to fully retract. That transition to full clutch clamp pressure then prevents further slipping, saving wear/tear on the clutch.
It's important to note that the more rigid your clutch assembly is, the more critical the overall precision of your clutch control system will be. If you have a small diameter clutch with heavy spring pressure, as well as a non-compressible clutch disc, just a few thousandths variation in throw-out bearing position during launch can have you chasing your tail instead of making progress.
The key to the Hitmaster's un-matched accuracy is the adjustable travel distance of an in-line hydraulic piston (provisional patent application for this feature was submitted back in April 2019), which momentarily limits how far the throw-out bearing is allowed to retract during launch. If the Hitmaster's piston stroke is set to allow 4.92cc of fluid return in the Hitmaster's 1st stage mode, EXACTLY 4.92cc of fluid will return during launch regardless of external variables. That precision control of return fluid volume is especially critical in small clutch / big power combinations, it's why some of the quickest/fastest stick-shift FWD/AWD cars in the world now use the Hitmaster after trying many other clutch control products.
Here are some external variables that have ZERO affect on the accuracy of the Hitmaster, but can affect the results from other clutch control systems...
...fluid temperature/viscosity changes (cold morning fresh off the trailer vs hot afternoon hot lapping)
...how fast you pull your foot off the clutch pedal (tired at the end of the day or excited trying to cut a good lite?)
...system pressure changes (amount of clutch lever/finger centrifugal feedback pressure which varies with launch rpm)
...accuracy/precision of a trigger switch and it's installation geometry/adjustment
Once again, these external variables have ZERO affect on the throw-out bearing placement accuracy of the Hitmaster!
Is reaction time important to you? When you dump the clutch with the Hitmaster, fluid returning from the throw-out bearing or slave is not slowed down by any sort of restriction/orifice/solenoid. A restriction might not be a problem if your track uses a full tree, just dump the clutch earlier. But on arm drop, flashlite starts, or even a pro-tree, any sort of delay in the clutch hit can be a problem!
The Hitmaster can greatly improve your consistency, it can also help you deal with changing track condition. If you dial it in for a no-bog dead hook launch on a poor surface, your results won't change much if the surface improves.
Some more experienced racers wish they could change the clutch setting before staging, depending on what they see on the starting line. With the Hitmaster, just reach over and turn the knob without removing your gloves.
Downside to the Hitmaster system? it can be difficult to initially bleed.
...1- When buying a new clutch, try to match it's torque capacity to your engine's output- A clutch that has just enough overall capacity to handle all your engine's power will give you the broadest possible clutch tuning window.
...2- Line-lock and 2-step switches should not release from top of clutch pedal travel- With the ClutchTamer or Hitmaster controlling clutch engagement, your clutch pedal may not immediately return to the top of its travel when the clutch pedal is released. If you use an oem style upper clutch pedal switch to release the 2-step and/or line-lock, the result could be a second or so delay of when the pedal contacts the clutch switch. Late release of the 2-step will likely only cause a performance issue, but late release of the line-lock will cause a safety issue. Please make sure that your line-lock is not releasing AFTER the clutch hits!
...3- Adjust the clutch pedal stop- Before you adjust the clutch's 1st stage draw rate, it's very important that you install a clutch pedal stop and verify its proper adjustment. By proper adjustment, I mean a setting that allows enough clutch dis-engagement to achieve clean hi-rpm shifts, but also enough dis-engagement to be able to put the transmission into gear without grinding when the clutch is warm. Using a pedal stop helps ensure a consistent release point, which in turn helps ensure that you get repeatable results. If for some reason you have to change your pedal stop height after you begin the tuning process (maybe you find the clutch isn't releasing cleanly which causes a shifting problem), you may have to go back and repeat the tuning process all over again.
...4- Adjust Launch RPM- Changing launch rpm can affect your clutch's 1st stage inertia draw rate!!!!!! Even without any sort of "centrifugal assist", a typical 10.5" diaphragm style pressure plate can gain around 350lbs of clamp pressure just by going from 4000rpm to 7000rpm. For best ET, you generally want to stage at least 2000rpm above your engine's torque peak. You can choose any launch rpm you want (typically the higher the better), but it's a good idea to keep launch rpm consistent from run-to-run if you want consistent results.
...5- Adjusting the clutch's 1st stage inertia draw rate-The HitMaster 1st stage control valve has one simple dial type adjustment for controlling the intensity of the initial hit....
.........if the tires spin or the engine bogs during launch- turn the adjustment knob clockwise (reduces piston travel distance)
.........if the clutch slips too much during launch- turn the adjustment knob counter-clockwise (increases piston travel distance)
The Hitmaster does have one other thing to adjust, when to shut the system off and allow the throw-out bearing to fully retract. This transition is typically set to happen around 0.80sec out or around 20mph, it can be controlled by either a button activated timer or mph switch function programmed into an ecu. Exact timing of when this transition occurs is not critical to performance, as by that point in the run the clutch should either be already locked up or very close to it.
When you find a good setting for a particular surface/condition, we strongly suggest you record those conditions/settings for future reference. The least expensive way to reference a particular setting is to use a caliper and measure/record the length of exposed threads between the 1st stage control valve's knob and nylon guide housing.
Another way to measure/record a Hitmaster valve setting is to use a throw-out bearing pressure gauge/sensor. Here's a graph showing why you should only use data from either static or low rpm clutch snaps when comparing Hitmaster settings...
...Red- engine rpm (ranges from idle to 6900)
...Green- throw-out bearing Psi (ranges from 444psi to 600psi)
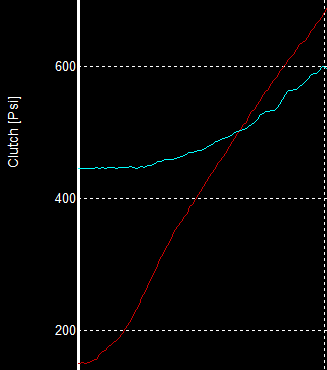
For the above graph, first the clutch pedal was held in a single position against its travel stop, then engine rpm was increased. As you can see from the fluid pressure sensor, centrifugal forces had little effect on throw-out bearing Psi below 2500rpm. But as engine rpm was increased, notice that throw-out bearing Psi increased from 447psi @ 2500rpm to 600psi @ 6900rpm due to centrifugal forces acting on the diaphragm's levers, throw-out bearing position did not change. This shows that throw-out bearing Psi is not an accurate indicator of throw-out bearing position above 2500rpm. For that reason, use only Psi data from around idle speed when comparing Hitmaster valve adjustment settings.
For clutch tuning our Shop Mule test car, we added the pressure sensor to the end of our hydraulic throw-out bearing's bleed hose. That pressure sensor's data is displayed to the driver by a Racepak Intelli-gauge, allowing for precise on the spot 1st stage clamp pressure changes without consulting a laptop. The Racepak data recorder is set to initiate a test session when triggered by the line-lock button. After data collection starts, we then put the shifter in neutral and "dry-snap" the clutch pedal @ idle prior to staging. That gives us a recorded snapshot on that run's graph showing the throw-out bearing's Psi release curve, leaving no doubt about what clutch control adjustments might have been in place for that pass.
CHANGING THE GAME ON LAUNCHING YOUR STICK SHIFT CAR!!!