
Engine torque is something most car guys think they understand, so giving them torque ratings to compare while clutch shopping preemptively answers a lot of questions. A clutch manufacturers torque rating is just a quick/dirty way for the typical aftermarket clutch buying customer to feel assured that the clutch they buy isn't going to slip against the torque their engine is capable of. From the perspective of the aftermarket clutch manufacturer, if the clutch breaks something else downstream it's not their problem, at least the customer won't come back complaining about a weak clutch. In reality, choosing a clutch is more complicated than just engine torque. To keep your stick shift drivetrain alive, it's important to pay attention to what happens inside the bellhousing.
The T5 5spd serves as a good real-world example. It was an OE transmission for both GM and Ford, and the 2.95 gearsets for both versions are nearly identical as far as case/gear strength. But the GM version of the 2.95 V8 T5 has a reputation as being weak, while it's pretty common to see Ford version of the 2.95 V8 T5 running 10's on the dragstrip with slicks. The difference is the clutches that are commonly used with each version. The GM T5 guys almost always go to the aftermarket and end up with around 2800-2900lbs of clutch clamp from a 10.5" diaphragm, while the go-to clutch for the Ford T5 guys is the Ford Motorsport "King Cobra" 10.5" diaphragm which has 2124lbs of clamp.
The typical aftermarket clutch customer doesn't realize the ideal clutch is one that WILL slip. Not a clutch that slips against the maximum HP/TQ number that the engine is capable of, the clutch isn't going to see that static number at any point while the car is working its way thru the gears. The clutch's basic job in a drag race setting is to allow the engine to operate near its power peak, with a goal of maximizing power production, hopefully without exceeding that clutch's thermal limit. If you are stuck with the engagement characteristics that are baked into a clutch's design and materials, it's critical that the clutch you choose is a good match to your specific combo.
The clutch's stored energy draw rate is every bit as important to the performance of a stick shift car as is choosing the right converter for an automatic car. When you just bolt in a typical non-adjustable clutch, you are pretty much locked into whatever rate it might pull your engine down against WOT. Don't buy a clutch with plans to "grow into it", it is far better to pick one that's the best match for your engine and use. Not a situation where too much is just right. Excess torque capacity not only increases the clutch's potential to inflict damage on your drivetrain, but it will also slow you down at the dragstrip. The target should instead be a clutch that slips for a half second or so after a WOT shift into high gear.
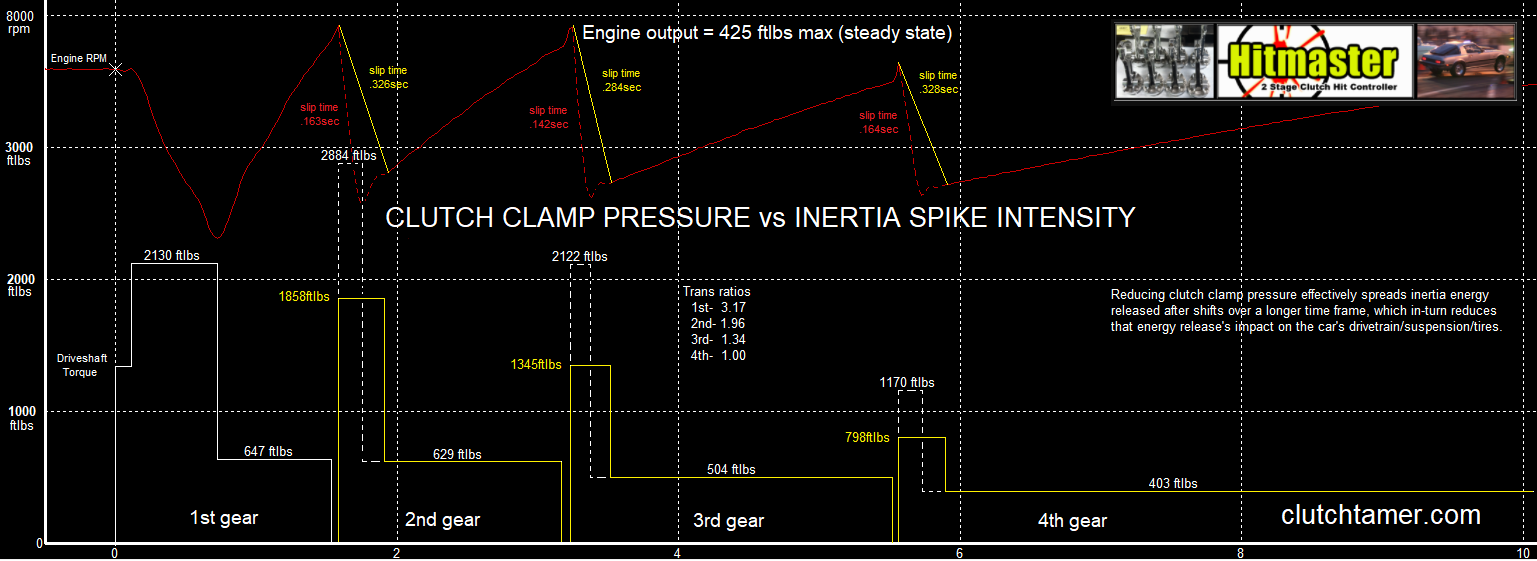
The Racepak graph below is of a dragstrip pass with an engine that puts out around 425ftlbs max WOT steady state. I added some averaged binary torque numbers to the lower part of the graph to reflect the calculated torque that the engine applied to the transmission's input shaft during the pass. Note how this 425ftlb engine put out way more than 425ftlbs when it is losing rpm, and much less than 425ftlbs when it is gaining rpm. At no time during this pass was this 425ftlb engine actually sending 425ftlbs to the transmission's input shaft, because at no time during this pass was the engine operating at a constant rpm. The engine was either losing or gaining rpm at every point after launch while it worked its way thru the gears. Note that during the climb in 1st gear, less than half of that engine's potential torque output was actually reaching the transmission's input shaft!
...you might ask- If this Engine is capable of 425ftlbs, WHERE DID ALL THAT MISSING TORQUE GO???...
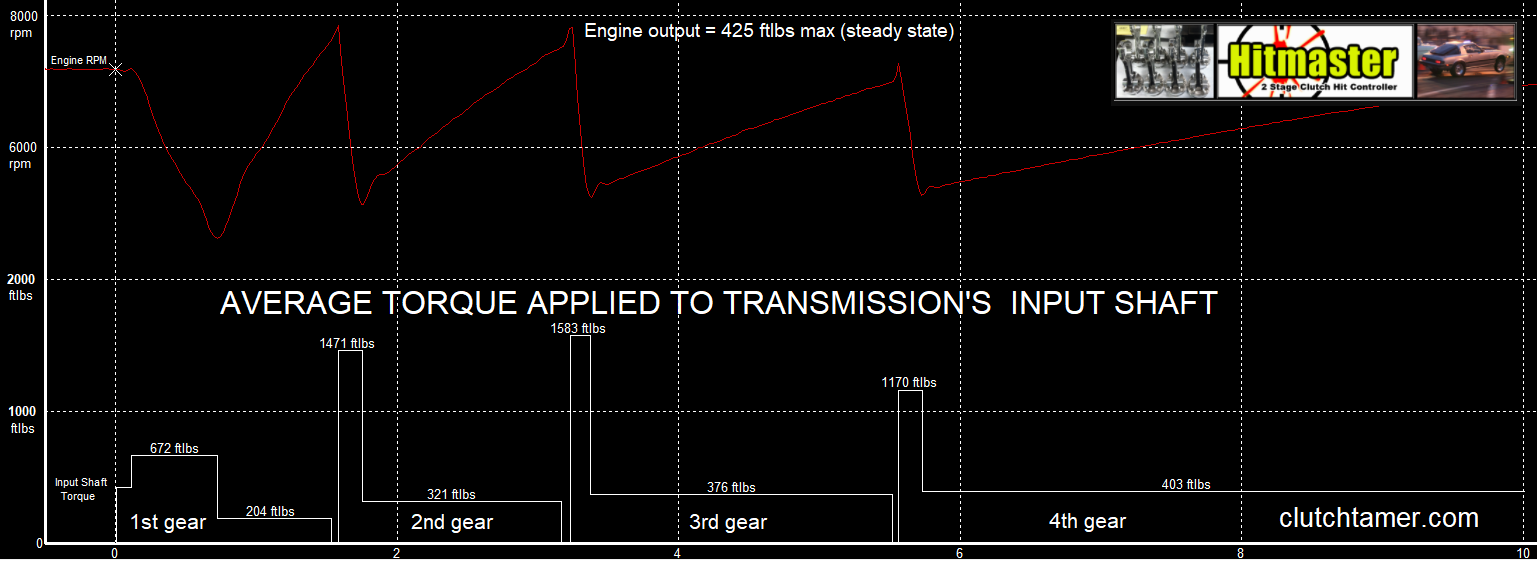
To wrap your head around this, it helps to think of the engine's rotating assy as a torque storage device. Everything spinning ahead of the transmission's input shaft, crankshaft/balancer/pulleys/flywheel/pressure-plate/etc, it's all basically one big energy storing flywheel. The reality is that some of this engine's torque was being absorbed by its rotating assy as it gained rpm, and then that stored torque was returned to the input shaft as rpm was drawn out of that engine's rotating assy against WOT.
From there, it's important to understand that the rate that the clutch draws engine rpm down is what controls how that absorbed/stored torque gets applied to the transmission's input shaft. Using nice round numbers to make it easy to grasp the inverse relationship, let's say a rotating assy gains 2000rpm in 1 second while absorbing 200ftlbs of torque during the engine's climb to the 1/2 shift point...
...If the clutch then draws out the same 2000rpm over the same 1 second time period after the shift, 200ftlbs gets added back to the input shaft torque for 1 sec.
...If the clutch then draws out 2000rpm over 0.5sec, 400ftlbs of torque (double the torque) gets added to input shaft torque for that 0.50sec.
...If the clutch then draws out 2000rpm over 0.25sec, 800ftlbs of torque gets added to input shaft torque for that 0.25sec.
All three above examples of discharge rate release the same quantity of energy. Give the car 200ftlb "boost" for 1sec (200 x 1 = 200), vs a 400ftlb boost for .5sec (400 x .5 = 200), vs an 800ftlb boost for .25sec (800 x .25 = 200), it's all basically the same amount of boost available from 2000rpm's worth of returning energy.
When you go beyond daily driving and move to the track, drawing that stored energy out too fast can cause other problems downstream. The initial problems are likely to be either traction or finding weak links in your drivetrain. If the tires go up in smoke, the typical solution is to buy better tires. If the problem is wheelhop, new bushings/shocks/chassis components. If the driveshaft or u-joints fail, bigger/stronger parts. If the transmission breaks, stronger trans. Break rear gears/diff/axles, spend another pile of money on a rear upgrade. But even after you get all those things sorted out, you will find your combination is still not performing to its potential, as now the engine bogs. But when the root cause of the cascading problems is an overkill clutch that draws too much torque from the rotating assy, addressing that problem first could save you from making a lot of un-necessary upgrades.
Given that a 2000rpm discharge releases the same basic quantity of energy regardless of how fast you lose the rpm, you have to ask yourself how big of a torque spike can your drivetrain/chassis efficiently handle? Are the tires going to be shocked into excessive wheelspin and waste a large portion of the returned energy? Is it going to break something? Would it be better to use a clutch that draws 400ftlbs of stored energy over 0.50sec rather than one that draws 800ftlbs over 0.25sec?
What about heat, isn't more slipping going to damage the clutch? Using your brakes also creates heat and shortens brake life, but as long as you do not overheat them they will last a good long while. Same with a clutch. Extending clutch slip time just a few tenths of a second can make a huge difference in terms of impact on your drivetrain.
If you are not slipping something in a drag race scenario, you are slow!!! While a properly slipping clutch does "waste" some power that gets absorbed into the clutch assy as heat, that slipping actually makes it possible to net an overall power production gain. That's because slipping allows the engine to make more power strokes in a given time frame, and that power production gain can more than offset the loss of heat energy absorbed by the clutch. Also because the car is gaining speed while the clutch is slipping, engine rpm does not get pulled down as far after the shift as the ratio change predicts, further raising average rpm. It is possible for the clutch to slip too much and squander your power production gains, the trick is finding the sweet spot.
Installing more clutch clamp pressure than you need is a step in the wrong direction, as the clutch is what brings the engine and chassis together as an efficient dragstrip package. Too much will pull inertia out of the engine's rotating assy at an excessive rate, which in-turn leads to bog/spin problems. It also narrows the sweet spot for clutch modulation, leading the clutch to act more like an on/off switch.
The purpose of optimizing clutch clamp pressure in a hotrod application is not to protect the rest of the drivetrain from impacts, that side effect is just a happy by-product. The real purpose is to make the car quicker by improving traction and optimizing engine power production. While it may be counter-intuitive, a softer hit on the drivetrain CAN make your car quicker to the 60'!
Aftermarket clutch manufacturers typically rate their clutches conservatively. Can't blame them, as the typical customer doesn't want a clutch that slips, and the manufacturer doesn't want a dissatisfied customer. But if you are serious about not leaving any ET on the table, you need to push beyond those manufacturer ratings.
For example, the typical aftermarket GM/Mopar pattern 10.5" diaphragm PP installed out of the box has about 2800lbs of clamp. It's hard to find anything less in the aftermarket, so let's see what 2800lbs of clamp gets you with different types of clutch discs....
Let's say your engine puts out 500ftlbs, how much clamp would you then need for a typical dual friction disc? For that you can calculate a percentage of the above ratings. The above says 2800lbs of clamp on a dual friction disc is ballpark for 655ftlbs. If you divide 500 by 655, you get .76 which means you would need 76% of 2800lbs or 2800 x .76 = 2128. In other words, a 500ftlb engine needs about 2128lbs of ballpark clamp on a 10.5" dual friction disc. Good luck finding that in the aftermarket.
The above clamp numbers get you in the ballpark. Ideally though you are not looking for a specific clamp number, you are actually looking for a clutch that has just enough overall clamp pressure to pull the engine down in about 1/2 a second after a WOT shift into high gear. The actual amount of clamp required to do that will vary with gearing and rotating assy weight, the easiest way to fine tune clamp pressure to suit the application is to use a Long style pressure plate that has adjustable static pressure.
There are also adjustable versions of diaphragm pressure plates available. Ram makes a billet aluminum cover model with adjustable stands, it has an adjustment range from about 1000-2250lbs of clamp.
...With an organic disc, 2800lbs is ballpark for an engine with around 500ftlbs of torque.
...With a typical dual friction disc, 2800lbs is ballpark for an engine with around 655ftlbs of torque.
...With a typical iron puck disc, 2800lbs is ballpark for an engine with around 810ftlbs of torque.
...With a cerametallic puck disc, 2800lbs is ballpark for an engine with around 820ftlbs of torque.
For example, Ram sells several versions of a basic non-CW 11" stamped steel Long with different ranges of adjustment. To take advantage of one, be sure it will fit inside your bellhousing and that your flywheel has the correct Long style bolt pattern...
......Ram #435 is adjustable between 1200-1800lbs
......Ram #448 is adjustable between 1500-2100lbs
......Ram #438 is adjustable between 1800-2400lbs
......Ram #458 is adjustable between 2200-2800lbs
Pick an adjustment range that gets you in the static pressure ballpark, then adjust spring pressure to optimize the engine rpm drawdown rate after the shift into high gear.
Matching a clutch's static clamp pressure to its application has a huge effect on how easy that clutch will be to tune. Say you install a 1200ftlb capacity dual disc clutch behind a 600ftlb engine, the tuning window for that application is going to be very narrow, which will in-turn make it very hard to find and consistently hit the sweet spot. Ideally, you want the clutch's overall torque holding capacity to be well matched to its application, which will give you the widest possible tuning window.
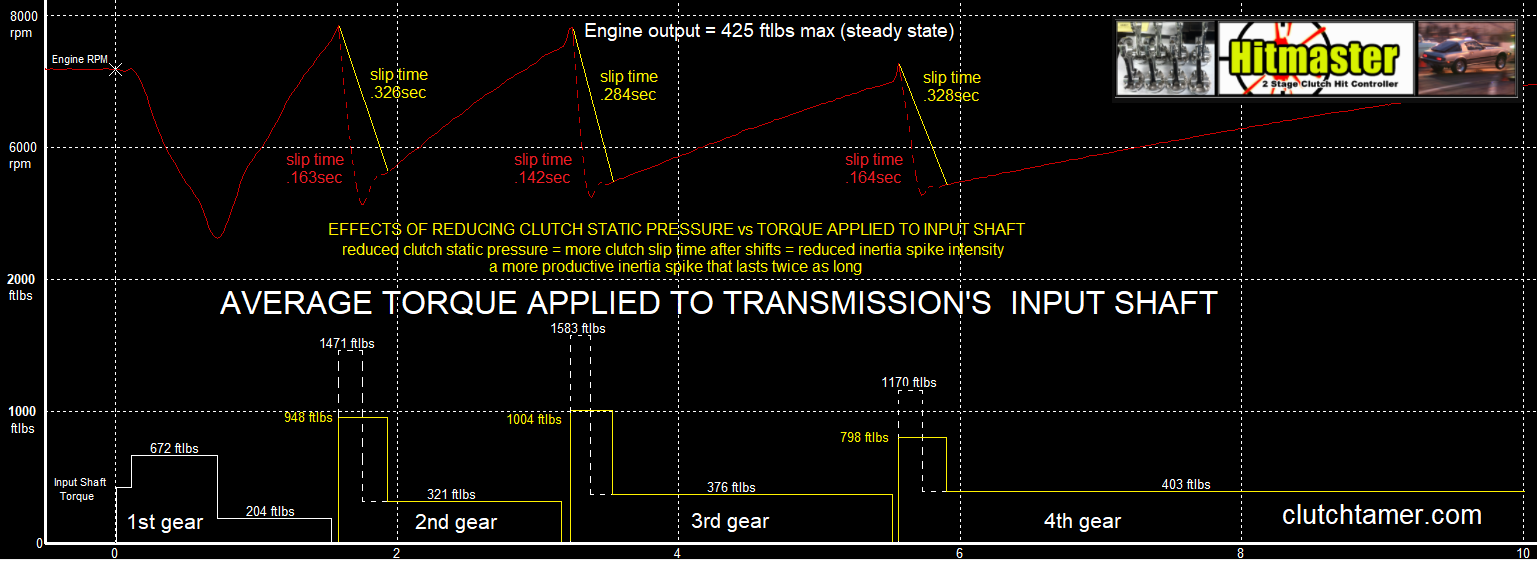
As you can see, proper clutch clamp pressure also greatly reduces the chances of breaking your transmission/drivetrain! Here's how that change in base pressure would affect the torque applied to the driveshaft...
Doubling clutch slip time basically cuts the intensity of the inertia spike in half. This makes the car far less likely to knock the tires loose after the gearchanges, which in-turn makes the clutch's sweet spot much broader and easier to hit.
Another important thing to note is how spring design affects clutch clamp pressure and tuning window as the clutch disc wears...
...Diaphragm PP springs are typically designed to go "over-center" around mid-point in their travel range. They start out gaining clamp pressure as the disc wears, then at about the mid-point of disc wear the pressure curve levels out and begins to gradually lose clamp pressure for the rest of the disc's life. Basically, you end up with about the same static clamp pressure at the end of the disc's life as you had when it was new.
...B&B and Long style PP coil springs gradually lose clamp pressure as the disc wears. That means you must start out with a wide margin of extra spring pressure when the disc is new, just to have enough static clamp pressure to hold at the end of the disc's life when it is thin.
Hypothetical example of why this is important to understand- let's say a given combo wants 2800lbs of single disc clutch clamp pressure to hold after the shift into high gear.
...With a typical diaphragm spring, you need 2800lbs of pressure plate with a new disc, in order to have about 2800lbs at the end of the disc's life.
...With coil springs, you might need 3500lbs of pressure plate when the disc is new, in order to still have 2800lbs of clamp available when the disc is used up.
In general, regarding clutches that are installed out of the box without any PP shimming...
...A diaphragm sprung clutch that is closely matched to its application will have a wider average tuning window over it's life, as clamp pressure varies less over the life of the disc.
...A coil sprung PP starts out with a narrower tuning window when new due to excessive clamp pressure, then that window gradually opens up as the disc wears. Generally, a well-matched out of the box coil sprung clutch will perform its best just before the disc is worn out.
If you want the clutch to perform at its best throughout the life of the disc, periodic maintenance shimming of the pressure plate is one way to keep clamp pressure in its optimum range for a wide tuning window, regardless of disc thickness.
If you shift using the clutch pedal and don't want to go to all the trouble of dialing in your clutch's static clamp pressure, installing my ClutchTamer product is an alternative that will allow you to soften the hit of your clutch after the shifts from your driver's seat.
Here's a link to the ClutchTamer's information page "CLICK HERE"
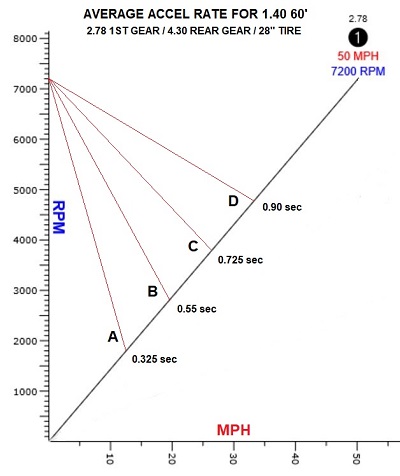
As much as you can get away with!!! Drag race starts are unique in that you have the ability to store inertia energy prior to the start. The faster you can spin the engine before the clocks start, the more inertia energy will be available to help move the car with the clocks running. The key to making all this work is being able to control the rate that the additional stored energy is fed into the tires/chassis.
In the graph above, lines A,B,C, and D represent different draw rates that the clutch is pulling down a 600ft/lb engine after a WOT launch.
Line "A"- The clutch is pulling engine rpm down way too fast. Even if the engine still magically made 600ftlbs at 1800rpm, that's only 205hp at the low point of the bog. Obviously, this 60' is going to suck!
Line "B"- The slower pulldown rate raised the rpm/mph sync point to about 2800 at 20mph, but still only 320hp at the low point of the bog.
Line "C"- Much better pulldown rate, now rpm stays above 3700. The engine is now up to about 420hp at the low point of the bog.
Line "D"- That extra slip time allows the engine to stay closer to its rpm sweet spot for HP production. The engine is now up to about 550hp at the low point of the bog.
Another consideration is the difference in engine rpm on the starting line vs engine rpm crossing the finish line. If the starting line rpm is lower than finish line rpm, that means over the course of the run the engine's rotating assy will absorb more energy than it gives back. This in-turn reduces the overall amount of energy available to accelerate the car.
But what would happen if the engine in that graph above were capable of raising the launch rpm from 7174 to 9000, with shift points/etc all remaining the same? The answer is the amount of stored energy available to assist launch would almost double, from 30.03 to 59.57 units of inertia. If you draw that 59.57 units in the same 0.589sec time frame that the 30.03 units were drawn out, the hit on the input shaft almost doubles in intensity, which would likely either break something or knock the tires completely loose. But if you use a clutch hit controller to draw that 59.57 units at same draw rate as the 30.03 unit hit, the intensity of the hit does not increase but the stored energy assist now lasts almost twice as long. The engine's power curve does not need to extend to 9k to exploit this, just capable of spinning 9k on the starting line without flying apart. Just an example of what the ability to control inertia draw rate can allow you to do.
 The general idea is to gear the car to keep the engine riding the plateau of its HP curve throughout the run. If hi-rpm clutch hit is going to pull the engine down about 2000rpm, and the engine's torque peak is around 5200, launch rpm should be at least 7200 so that the engine doesn't get pulled down below the rpm where it pulls it's hardest. This approach makes best use of your ability to store energy prior to the start, also helps keep your engine rpm up where it's making more average hp.
One of the simple things you can do when looking at a dead hook graph is to grab something straight and apply it to the screen, just a simple straight edge aligned with the upper section of the 1st gear engine rpm trace. I usually just grab an envelope and apply its edge to my computer screen...
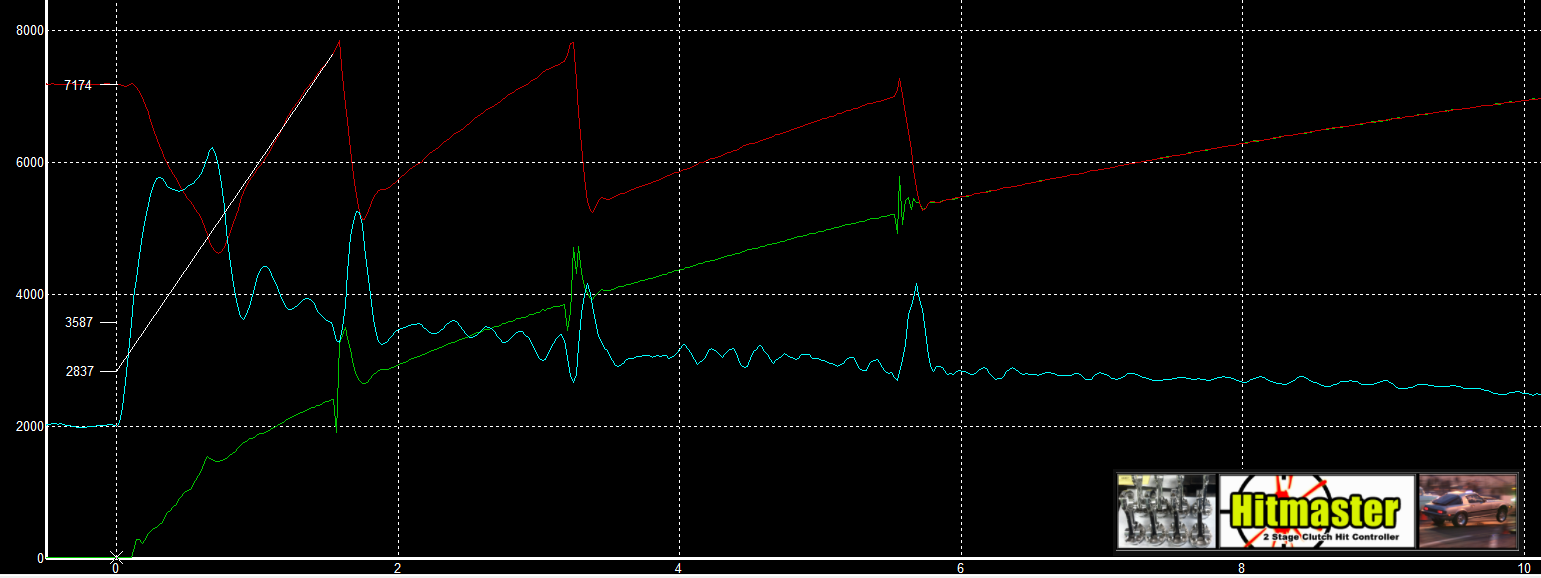
If you apply that straight line to most graphs where the climb to the shift point is dead hooked, it will likely cross the vertical "O" line somewhere between zero rpm and 50% of launch rpm. On this graph where the car is set off at 7174rpm, that means the line will likely cross the vertical "O" line somewhere between zero and 3587rpm. If it crosses around or below zero, launch efficiency was poor. On the other hand if it crosses at about 3587rpm, that's about as good as it gets. Notice this straight line hits the vertical "O" line at about 2837rpm. That's pretty good, about 79% of its 3587 ballpark potential, but there's still room for improvement.
It's important to remember that, although the flywheel/pressure plate absorb some of the engine's torque as they gain rpm, they also return that absorbed energy to the transmission's input shaft as the clutch pulls engine rpm back down. If the engine accelerates from a given rpm and is then pulled back down to that same rpm, it all ends up a wash as the amount of energy absorbed equals the same amount of energy returned.
If you are launching your car from a lower rpm than you are crossing the finish line with, overall more energy is getting absorbed with the clocks running than is getting returned. In this case lighter flywheel and pressure plate will always be better, as long as the clutch has enough thermal capacity to slip as required and still cross the finish line without damage. Because lighter components absorb less energy as they gain rpm, less energy absorbed makes more overall energy available to accelerate the car.
An exception to the above is when your clutch is so aggressive that it gives you big wheelspeed spikes after the shifts. Big wheelspeed spikes are basically wasted inertia energy that cannot be recovered. If you are throwing away inertia energy in wheelspeed spikes, installing a lighter flywheel will reduce the amount of inertia energy you are throwing away, which will in-turn show up as an improvement on your timeslip.
If you are launching from about the same rpm that you are crossing the finish line with, flywheel/pressure plate weight is not going to matter much as the flywheel/pressure plate are absorbing the same amount of energy over the course of the run as they are giving back. Since the flywheel/pressure plate weight isn't going to have much affect on your ET, it might be wise to go with slightly heavier components if that added mass gives you more of a safety margin against incurring heat damage.
If you are launching from a higher rpm than you are crossing the finish line with, you may benefit from a heavier flywheel/pressure plate. You still need to gear the car to make the most of your engine's power range, but if the engine is capable of spinning well past its power range, you should take advantage of that for launch. Don't go crazy though, as there is a point where increasing gyroscopic effects will cancel out the gain.
When a stick shift car does wild things on the starting line, first reaction is often to calm things down with shock adjustments. Be careful with that line of thinking though, as using the shocks to control what's really a clutch problem can leave potential on the table. The intensity of inertia energy leaving the engine's rotating assy during launch is dictated by how fast the clutch pulls the engine down. Stiffening the shocks may dampen the chassis' excessive reaction, but the clutch is still going to draw inertia out of the engine at that same excessive rate. Because shocks only serve to absorb energy without giving any back, tightening them should be one of your last resort solutions.
Rather than stiffen the shocks to control excessive inertia reaction, you might want to try slowing down the rate that inertia is fed into the chassis. Easy to do if you have a 2-stage clutch hit controller. Far less wear/tear on drivetrain components, sidewalls will also last much longer. After you discover that you can control the rate that inertia energy is fed into the chassis, you will then soon realize that there's not much keeping you from packing even more rpm/energy into the engine's rotating assy prior to launch.
Also be aware that excessively stiff shocks will reduce your chassis' ability to maintain traction over bumpy surfaces down the track. Your tires might skip right across those bumps!
The terms "traction control", "power management", and "strain gauge shift knobs" are really just hi-tech ways to say power reduction. If they called them what they really are, most racers would only resort to them when there's nothing else left to adjust.
WOT Ignition/Fuel Cut "Clutchless" Shift vs No-Cut WOT Shift Using the Clutch Pedal!!!- these are two completely different approaches to WOT shifts. You might think a clutchless shift will always be quicker, but consider the following...
...... A WOT ignition/fuel cut is about momentarily cutting engine power, for the purpose of reducing engine rpm, to facilitate a WOT clutchless shift. Easy to accomplish with a strain gauge shift knob, making it an obvious solution for "quick shifts". Problem with that line of thinking is that not only was power momentarily cut, but you also wasted a lot of stored inertia energy by using internal engine friction and pumping losses to quickly reduce engine rpm. That "smooth as butter" clutchless WOT ignition cut shift might seem quick, but it comes at a power production cost. Basically, with a cut it takes longer for the engine to produce "X" amount of power, and you always suffer the full amount of rpm loss after the shift that the ratio change predicted.
......A no-cut WOT shift "flare" is the product of turning the engine loose to produce/store energy as quickly as possible, even while the engine is momentarily dis-connected from the transmission. The flare is the product of the engine's rotating assy absorbing energy, and clutch control is the key to harnessing that flare's energy and applying it to the transmission's input shaft at a rate that the chassis can handle. The advantages are that you avoid the double loss of using stored energy to keep the engine spinning during a power cut. Also when you are controlling the clutch's pulldown rate to recover stored energy efficiently, engine rpm does not drop down as far after the shift as the ratio change predicted. So not only does the engine get to keep making power throughout the shift, but average rpm is also raised.
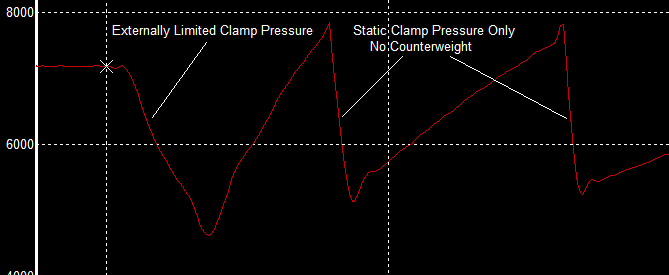
They may be described as "fully adjustable centrifugal assist" clutches, but they don't give you enough adjustment to allow taking full advantage of a hi-rpm launch and then still hold after the shift into high gear. You can adjust them for one or the other, but you can't have both. A centrifugal assist clutch needs that rpm difference between launch and shift rpm, as that is what allows for a softer hit during launch while then keeping you from blowing thru the clutch in high gear. That's just one of the limitations that comes along with using counterweight to add clutch clamp pressure.
THE DOWNSIDES OF USING CENTRIFUGAL ASSIST - Rpm controlled centrifugal assist is generally used to prevent the clutch from pulling the engine down/out of its power range during launch. When adjusted as designed, centrifugal assist will automatically relax enough to let the clutch slip before the engine gets pulled below its torque peak. They also raise fallback rpm over that predicted by ratio changes after the shifts, which serves to increase the area under the engine's rpm trace. More area under the engine's rpm trace generally translates to more power produced in a given time frame.
......On the street- over about 1000hp, an adjustable clutch's drag strip tune is generally stiff enough for casual street driving. Mash the throttle to pass someone though, that race clutch tune is going to slip unless you downshift to pick up some centrifugal assist. In my opinion, 1000+ hp on the street looks kinda silly when it has to downshift to pass someone. To prevent that embarrassment, many street/strip racers find it necessary to adjust their adjustable clutches back and forth between street and race clutch tunes. That usually means jacking up the car to make the adjustments, which in-turn means a good jack and jack stands are required. Keep in mind that the engine has to be rotated to at least 6 different positions to facilitate the adjustments, also the danger of being under the car and forgetting to place the transmission in neutral before rotating the engine. That's a lot of extra hassle for a guy that wants to drive his car to the track.
......On the track- An adjustable clutch that actively relies on rpm to increase its torque capacity is less than ideal for drag racing. They were an improvement over earlier non-adjustable versions mainly because the clutch can be adjusted to slip below the engine's torque peak, which in-turn prevents the clutch from pulling that engine down out of its power range regardless of launch rpm. This also made it possible to adjust launch intensity simply by varying launch rpm. The downside is centrifugal assist clutch forces you to compromise on how much rpm you can bring to the starting line.
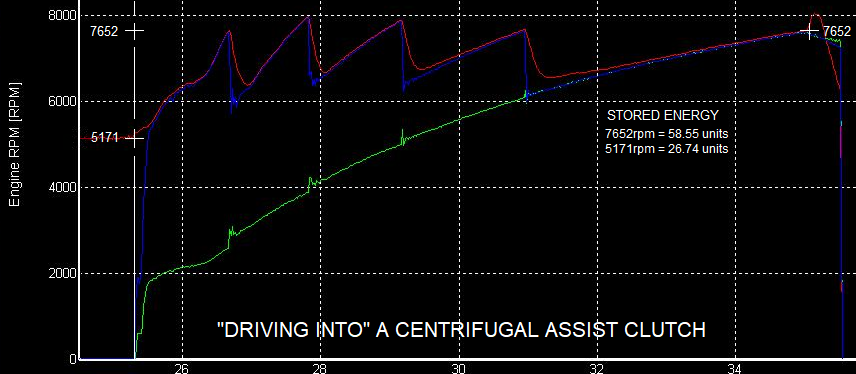
As the above graph shows, this adjustable centrifugal assist clutch equipped car launched from 5171rpm with very good efficiency considering the rpm that it launched from. One thing to note though is that it crossed the stripe at 7652rpm. That basically means that over the course of the pass, this engine's rotating assy absorbed 31.81 more units of inertia energy than it would have if it had launched from 7652rpm. If this car had been capable of efficiently launching from 7652 instead of 5171rpm, an additional 31.81 units of stored energy would have gone into accelerating the car instead of being absorbed by the engine's rotating assy.
The clutch's engagement characteristics and consequently how fast the clutch pulls the engine down during launch, as well as after the shifts, are among the most important adjustments you can make to a stick shift drag car. Torque x RPM, highest average number wins if you can get all that power to the track consistently. Raising launch rpm adds area under the engine's rpm trace, which means the engine will produce more power strokes in a given time frame. But what happens after the shifts can also add area under the engine's rpm trace.
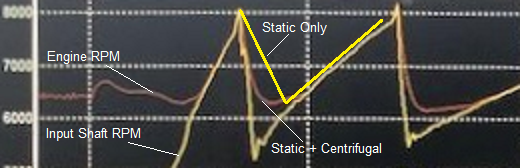
With the typical diaphragm, B&B, or Long style pressure plate (spring pressure only, no added centrifugal assist), the drawdown part of the engine rpm trace after the shift will be pretty linear, basically a straight line like on this graph below...
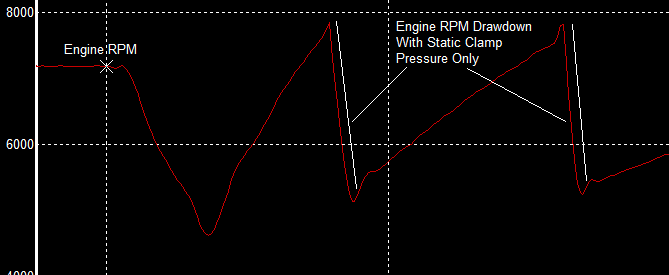
With a SoftLok style "adjustable slipper clutch" that uses counterweights in addition to spring pressure to clamp the disc, the drawdown part of the engine rpm trace will form a gradual curve. Because the centrifugal counterweight component relaxes as the clutch pulls engine rpm down, overall clutch clamp pressure relaxes as well. Note that engine rpm initially drops very quickly after the gear change (trace falls almost straight down initially), but then the trace begins to curve as the clutch gradually loses it's ability to pull the engine down any further...
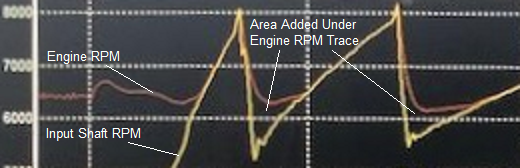
An advantage of the curved engine rpm drawdown shape after the shift is that it adds area under the engine's rpm trace (more engine power strokes in a given time frame). If the clutch had not slipped at all after the above 1/2 shift, the ratio change dictates it would have pulled the engine down to around 5245rpm (input shaft speed) after the tires hooked back up. But because the SoftLok style clutch has an additional centrifugal component, clamp pressure gradually relaxed as the engine lost rpm, which in-turn gradually slowed down the rpm loss. Because the car was also gaining speed while the clutch was slipping, the delayed lockup point raised the minimum rpm after the shift to 6302 instead of drawing the engine all the way down to 5245rpm as predicted by the ratio change. That added clutch slip time effectively tightens up the engine's operating range, which in-turn allows the engine to operate higher on the plateau of its HP curve.
Going back to the static-only (no added centrifugal assist) straight line clutch graph, it's important to know that you can adjust the angle of engine rpm drawdown after the shifts by adjusting the clutch's static clamp pressure. Note on the below graph that the angle of drawdown after both shifts are basically the same, while the drawdown after launch is still straight but the angle is different as launch rpm was drawn out over a longer time period...
The above difference between launch and after shift drawdown angles was made possible by externally controlling throwout bearing position during launch. Basically the throw-out bearing was not allowed to fully retract during launch, which prevented the full force of the clutch's spring pressure from clamping the disc. The throw-out bearing was then allowed to retract shortly after launch, which in-turn increased the clutch clamp pressure available for the shifts. The angle of drawdown during launch is adjusted via throw-out bearing position, while the angle of drawdown after the shifts is adjusted via static clamp pressure. In the end you end up with more clutch slip during launch, and less clutch slip after the shifts.
Here's the SoftLok style curved drawdown shape compared to what the "static only" straight drawdown could look like if static clamp pressure were optimized. Notice how the "static-only" (no centrifugal assist) straight-line drawdown angle can be optimized to add even more area under the engine's rpm trace than the traditional SoftLok style curved drawdown. Also note that the initial drawdown after the shift is not as steep. That flatter angle indicates energy is leaving the engine's rotating assy at a slower rate initially, which in-turn makes it easier to keep the tires stuck thru the shift. Because the engine is producing power at a quicker rate during the optimized "static only" straight-line drawdown, the clutch lockup point occurs sooner, which then allows the engine to get a head start on its climb to the next shift point...
When you add external throw-out bearing position control to the "static only" (no centrifugal assist) straight-line drawdown, it allows you to take advantage of much higher rpm launches without knocking the tires loose. That adds even more area under the engine rpm trace without dragging the engine down. The resulting high rpm dead hook launch really shines on a crappy track, it also reduces the need to adjust tire pressure and launch rpm for the purpose of controlling wheelspeed. Without the need to control wheelspeed, you will likely be able to make use of less first gear ratio, which will in-turn allow tightening up the gear splits if that is an option for you. Little gains here and there, but it all adds up.
Like I said earlier, it will be far easier to tune your adjustable clutch if you just throw away the weights and then put just enough spring in it to hold after shifting into high gear. From there use one of my clutch hit controllers to control throw-out bearing position during launch. Completely eliminates the centrifugal vs base balancing act, as it allows you to adjust launch clamp pressure without affecting high gear clamp pressure. Far simpler way to tune a clutch, and you won't need help from an expert to dial it in.
......If it slips too much or not enough going into high gear, you know you need to adjust the spring pressure.
......If it slips too much or not enough during launch, you dial that in with the clutch hit controller from the driver's seat.
In the end its much like a quick automatic transmission car. A less efficient coupling (converter) allows the engine launch higher and gain rpm faster, while also reducing rpm loss after the shifts. The increase in power production shows up as more area under the engine rpm trace, and that added power production more than offsets the loss of mechanical efficiency.
In my opinion, below about 1200hp the traditional "adjustable slipper clutch" style centrifugal assist clutch tune is becoming outdated tech. First it limits your ability to take advantage of launch rpm, then it has a tendency to knock the tires loose after the shifts. Knocking the tires loose after the shifts is usually what prevents guys from making the switch to radials. Even if you have a modern ECU that allows momentarily reducing power to absorb the spike after the shifts, those momentary power reductions will still cost you ET vs a properly adjusted "static only" clutch that needs minimal or no power reduction after the shifts. Combine that with the ability to raise launch rpm by controlling throw-out bearing position during launch, the adjustable centrifugal assist feature in most cases becomes obsolete.
Most stick shift drag racers subscribe to the conventional wisdom that says the heavier a drag car is, the more abuse it will inflict on its transmission and drivetrain. My viewpoint is the only way adding weight makes an actual difference is if wheelspeed is part of the launch. Adding weight typically equals more weight on the tire, requiring you to hit that tire harder with inertia to get the wheelspeed you need, which in-turn means the transmission will then see a higher peak load as a result. But all that changes when you install a 2-stage clutch hit controller, as the goal with a clutch hit controller is not controlled wheelspin, but instead controlling the rate that the clutch draws inertia against WOT. Since a heavier car accelerates at a slower rate, it's clutch will also need to draw the engine down at a slower rate to keep rpm in its optimum range.
Here's a crude theoretical comparison based on Wallace calculator "ideal" numbers. One 3500lbs and the other 2500lbs, both with the same 620whp. Wallace says the 3500lb car runs 10.00 @ 132.5 with a 1.39 60', while the 2500lb car runs 8.95 @ 148.04 with a 1.24 60'. Both have same tires, same 1st gear, and both geared for 7500 at the stripe- 4.72 gear for the 3500lb car and 4.22 gear for the 2500lb car. Both are also using clutch hit controllers tuned for a 7500 hit that draws down to 5500 before the clutch locks up. Based on averaged acceleration rates over the first 60' of each car, the 3500lb car takes 0.81sec to draw 2000rpm worth of inertia, while the 2500lb car accelerates quicker and takes only 0.755sec to draw the same 2000rpm of inertia. The heavier car spreads the same inertia draw over a longer time period, which in-turn effectively reduces the peak impact value of the inertia that gets passed along to the input shaft.
A key thing to note is that although both cars in the above example have the same 620whp and transmission, rear gears are different to achieve the same 7500 at the stripe-
If one were simply increasing weight with the same rear gearing, then that conventional wisdom would apply. But when you gear for the stripe as drag racers do, the heavier/slower car gets more rear gear which in-turn decreases the load on the transmission. When you remove wheelspeed from the stick shift launch equation, in-turn allowing both clutches to be tuned to draw the same amount of inertia, that conventional wisdom goes right out the window.
The most surprising thing that you will find with our ClutchTamer & Hitmaster products is how much more power you will be able to put down without breaking parts!
......4.72 for the 3500lb car that goes 132mph
......4.22 for the 2500lb car that goes 148mph
CHANGING THE GAME ON LAUNCHING YOUR STICK SHIFT CAR!!!