
It's a hard fact of stick shift drag racing that your clutch needs to slip more during launch than it does after the shifts. You might try to make that happen by using your foot to withhold some clutch clamp pressure during launch, but that will require a lot of trial and error testing to achieve even a minimal level of precision/consistency. A more efficient solution to the problem is using a device such as my Hitmaster valve (patent pending) to convert your clutch into an externally controlled 2-stage unit. A 1st stage of limited clutch clamp pressure that has been optimized for your best launch, that then transitions to a 2nd stage of full clamp pressure to make sure you don't blow thru the clutch after the shifts. The advantage of a 2-stage system is that it gives you the ability to store more energy prior to the start by raising launch rpm, and then put that additional stored energy to work without spinning the tires or breaking parts to improve your ET after the clocks start running.
Unlike other systems, the Hitmaster has no internal orifices to slow down your reaction time when you dump the clutch. And since throw-out bearing location during launch based on mechanical volume, it does not care how hot the fluid is, how hard the clutch fingers are pushing back at the throw-out bearing, what your launch rpm is, or even how fast you release the clutch pedal.
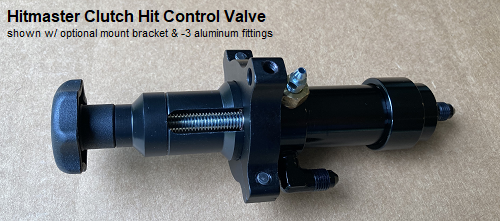
The Hitmaster system is unique in that it uses positive fluid volume displacement as a means to control throwout bearing position during launch. Fluid does not flow in one side of the Hitmaster valve and out the other, as the valve's two ports are internally separated by a piston. Fluid entering the slave side of the valve pushes a piston, that piston then pushes fluid out the master side of the valve. As that piston moves, its allowed travel distance is what determines the volume of fluid allowed to exit the master side of the valve. The adjustment knob on the Hitmaster valve is what determines the piston's allowed travel distance, which then in-turn controls how far the throw-out bearing is allowed to travel when the clutch pedal is released. The internal piston is biased to the slave side of the valve's bore by an internal spring.
Inside the basic Hitmaster system, there are 3 possible fluid flow paths between the clutch master and hyd t-brg/slave...
......path 1- 2nd stage transition valve- a normally open bypass valve which allows returning fluid to bypass the volume limitation of the Hitmaster valve.
......path 2- check valve- allows fluid flow from master cyl to t-brg/slave when the transition valve is closed, does not allow fluid flow in the opposite direction.
......path 3- Hitmaster valve- controls 1st stage throwout bearing position by limiting the volume of fluid allowed to return when the clutch pedal is released if the transition valve is closed.
This is how those flowpaths are used...
......push the clutch pedal with solenoid de-activated (open)- fluid flows from the master to the slave thru the open bypass solenoid (path 1).
......release the clutch pedal with the solenoid de-activated (open)- fluid returning from the slave to the master flows thru the open bypass solenoid (path 1).
......push the clutch pedal with solenoid activated (closed)- fluid flows from the master to the slave thru the solenoid's internal check valve (path 2) The check valve is located inside the 2nd stage transition solenoid.
......release the clutch pedal with the solenoid activated (closed)- fluid returning from the slave must enter the Hitmaster valve (path 3). When the valve's piston reaches the limit of it's travel, fluid return flow stops.
When staging it doesn't really matter if the Hitmaster system is activated before or after the car is fully staged, as the fluid movement back and forth for staging will be less than the piston stroke distance. You can pre-load the drivetrain with the clutch pedal if you want to, but the pedal needs to be pushed against the stop at least once after the system has been activated. This ensures a consistent overall volume of fluid will be active within the 1st stage of the system. That being said we generally recommend against pre-loading the clutch prior to launch, as it makes you venerable to getting your clutch burned down by a late staging opponent. A lot of pre-loading imports pull thru the beams pre-maturely at big events, as many wise racers in the other lane know the chances are good that a pre-loading opponent on the 2step will pull thru the beams and redlite if their clutch gets too hot.
Our HitMaster System components all come with female 1/8" npt fluid ports. From there, it's pretty easy to plumb the system with just about any style of fittings/hose you might choose. The typical "domestic" hydraulic clutch release system operates on less than 500psi, "imports" with small dia clutch master cyls can be 1000+psi! Although the system could be plumbed with hard line, we strongly suggest using hose as the added flexibility of hoses will definitely make the system easier to bleed.
When plumbing the Hitmaster system, be sure to use PTFE lined hoses. Exact length of the hoses needed depends on where you choose to mount your Hitmaster valve and transition valve. Imports generally use smaller ~5/8" master bores and are fine using -3 fittings/hoses, while domestics typically use 3/4" and larger masters that are better suited to using -4 fittings/hoses. AN fittings are basically the same as JIC as far as sealing geometry, so it's pretty common to see mixing/matching of the two in an automotive application. JIC spec fittings and hose ends are typically made of steel and are generally less expensive than the typical anodized aluminum AN counterpart. JIC fittings can be found along with PTFE lined hoses at suppliers such as Summit Racing or local hydraulic supply shops.

When the system is at rest (casual driving), no voltage is applied to the 2nd stage transition valve. The 2nd stage transition valve is "normally open" when no power is applied, so fluid is allowed to flow freely in both directions between the clutch master cylinder and slave cylinder.
When the line lock button is depressed, the transition timer also recieves a 12v trigger signal. This causes the transition timer's relay section to close the contacts between it's "common" and "NO" terminals, which in-turn energizes the 2nd stage transition valve with 12v, causing the transition valve to "close". Because the transition valve is now closed, pushing the clutch pedal will result in fluid flowing from the master cylinder, thru the transition valve's internal check valve, then on to the slave cylinder.
On release of the line lock button, the transition timer loses it's trigger signal, causing it to begin it's countdown. For the duration of the countdown, the transition timer keeps the transition valve energized/closed. With the transition valve closed and it's internal check valve blocking return flow, releasing the clutch pedal results in fluid returning from the slave cylinder to enter the middle "inlet" section of the 1st stage control valve. This causes the 1st stage control valve's internal piston to move against it's internal bias spring, which pushes fluid from the 1st stage control valve's "outlet" port back to the master cylinder. When the 1st stage control valve's internal piston reaches the limit of it's travel, return fluid flow effectively stops, which in-turn effectively stops slave cylinder travel well short of it's fully released position. This temporarily limits the clutch's overall clamp pressure to a reduced 1st stage level of controlled clutch "hit".
When the transition timer times out, it's relay section "opens" the contact between it's "common" and "NO" terminals. With the transition valve no longer recieving power, it then reverts to it's "normally open" mode, which then allows the remaining fluid to bypass the 1st stage control valve and return to the master cylinder. This allows the clutch to almost instantly transition from it's 1st stage of "controlled hit" to it's 2nd stage of "full clutch clamp pressure".
BASIC SYSTEM WIRING- here's a schematic for a simple basic system, triggered by a manually released shifter mounted button. Configured this way, the system is active only during launch, and not on the shifts.

ADDING A BURNOUT BUTTON- some customers like to do 2nd or even 3rd gear burnouts, which require a more aggressive clutch setting to get the tires spinning. Holding a "momentary off" button down allows the clutch to go directly to the 2nd stage when starting the burnout. You could achieve the same result by installing a toggle switch and turning the system off, but then you would have to remember to turn the switch back on when staging the car. Since many of our customers have fragile drivetrains, forgetting to turn the system back on before launch could cost them a lot of money or at minimum an aborted pass. This schematic also shows how to trigger the system from an existing linelock system, just connect the blue wire in the schematic below to the solenoid side of your existing linelock button. This schematic also shows the correct way to add a 1st stage indicator lite, it lites up any time 1st stage is electrically active.

Probably the most important thing to understand about bleeding the Hitmaster is that fluid does not flow thru the Hitmaster valve itself, as there is a piston inside separating the two ports. There is a bleeder screw on the side nearest the adjustment knob, but that bleeder only bleeds one side.
Easiest path to bleeding is to pre-fill the Hitmaster valve along with it's attached hoses. Basically, remove the valve/hoses from the car, grab the hoses and let the valve hang below with the adjustment knob facing down, then fill the valve/hoses with fluid. Easiest way I have found to inject fluid into the hoses is to use a syringe. When the hoses are full, cap them to minimize fluid loss while you re-install the valve/hoses in the car. After everything is in place, un-cap and re-connect the hoses to the rest of the system. From there, bleed the slave/throw-out bearing and bleeder screw on the Hitmaster valve as you would a brake system.
CAUTION- it is possible to "pump-up" the system in 1st stage mode, which could cause TOB over-travel and seal failure. Avoid the issue by letting the system's timer time out between clutch dumps.
...1- Adjust the clutch pedal stop- Before you adjust the 'tamer, it's very important that you install a clutch pedal stop and verify its proper adjustment. By proper adjustment, we mean a setting that allows enough clutch dis-engagement to achieve clean hi-rpm shifts, but also one that does not cause the car to creep with the clutch pedal against the stop at launch rpm. Using a pedal stop helps ensure a consistent release point, which in turn helps ensure that you get repeatable results. If for some reason you have to change your pedal stop height after you begin the tuning process (maybe you find the clutch isn't releasing cleanly which causes a shifting problem), you may have to go back and repeat the tuning process all over again.
...2- Determine a Suitable Launch RPM- For your best 60', don't be afraid of launch rpm with the Hitmaster softening the hit. With the higher you spin the engine prior to the start, the more energy you will have available to accelerate the car when the clocks are running. For best ET, you generally want to stage at least 2000rpm above your engine's torque peak. You can choose any launch rpm you want (typically the higher the better), but it's a good idea to keep launch rpm consistent from run-to-run if you want consistent results.
...3- Preliminary Adjustment of the Hitmaster Valve- If you activate the system without the engine running and also hold the launch button, you will be able to release the pedal from the stop and feel exactly where the 1st stage mode limits pedal travel. Be sure to release the button/pedal and let the timer time out, as multiple pedal strokes while in the 1st stage mode may damage your throw-out bearing. Adjusting the Hitmaster's knob will change where the pedal stops in 1st stage mode, about 2/3rds of the way up is a good initial target.
...4- Its Time to Make Some Live Engine Running Hits! The first few live hits shouldn't last more than a second or so. It helps to have a friend watch the tires from outside the car to verify the difference between tire spin and clutch slip. Make a hit and adjust from there.
A popular way to quantify your 1st stage settings is to plumb in a 0-1000psi pressure gauge, preferably installed in a location where the driver can see it when adjusting the Hitmaster valve.
If you have a data recorder with an open channel, may want to keep track of 1st stage pressure settings with a 0-1500psi brake pressure sensor. After starting the recording but before making a pass, slip transmission into neutral at idle and then simulate a clutch dump. Doing this allows you to see exactly, on the same graph, what the 1st stage pressure setting was before making that pass.
As for plumbing the 0-1500psi pressure sensor, our 2nd stage transition valve has a small 7/16" hex 1/8"npt plug between it's two lower ports. An alternate location for the sensor would be on the end of your throw-out bearing's bleed hose. It's important to note that a pressure sensor is really only useful for comparing static or low rpm data, as Psi data from an actual pass becomes increasingly corrupted/useless due to variations in centrifugal feedback.
......Do the tires spin? adjust the knob a couple turns clockwise, repeat the hit.
......Did the clutch slip excessively? adjust the inner "initial hit" dial a couple turns counter-clockwise, repeat the hit.
NOTE- The above will get you to about 90-95% of your potential. To get that last 5-10%, you will likely need some data. Timeslips from the track are very useful, but adding a data recorder can save a lot of trial/error testing.
With the engine off...
...turn the Hitmaster system on and use the button to put the system in 1st stage mode.
...push the clutch pedal all the way to the stop.
...release the clutch pedal.
...note Psi where the gauge's needle "pauses" before dropping to zero, that is your 1st stage Psi setting.
2-STEP / LINE-LOCK SWITCHES MUST NOT RELEASE FROM TOP OF CLUTCH PEDAL TRAVEL!!! With the Hitmaster activated, your clutch pedal will not immediately return to the top of it's travel when the clutch pedal is released. If you use an oem style upper clutch pedal switch to release the 2-step and/or line-lock, the result at minimum will be a delay of when the pedal contacts the clutch switch. Late release of the 2-step will likely only cause a performance issue, but late release of the line-lock will cause a HUGE SAFETY ISSUE! Please make sure that your line-lock is not releasing AFTER the clutch hits!
BEFORE YOU TEST YOUR HITMASTER, YOU WILL NEED TO INSTALL A PROPER CLUTCH PEDAL STOP !!! The best pedal stops are solid and located in the pedal box itself rather than a deflecting floor or firewall. A properly adjusted pedal stop allows enough clutch dis-engagement to achieve clean hi-rpm shifts, also enough dis-engagement to be able to put the transmission into gear without grinding when the clutch is warm. Using a pedal stop helps ensure a consistent release point, which in turn helps ensure that you get repeatable results. If for some reason you have to change your pedal stop height after you begin the setup process (maybe you find the clutch isn't releasing cleanly which causes a shifting problem), you will need to go back to Step 1 and do the setup process all over again.
DO NOT "PRE-LOAD" YOUR CLUTCH BEFORE LAUNCH!!! It is important to release the clutch from a properly adjusted pedal stop. Many import racers "pre-load" their clutches in an attempt to minimize parts breakage, DO NOT do this when using the Hitmaster. Pre-loading is basically releasing the clutch pedal to a point where the clutch starts to drag before the green turns on, an attempt to take all the "slack" out of the drivetrain. Problem is letting the clutch drag before launch can increase clutch temp quite a bit, which will then affect how hard the clutch hits. This practice also puts one at risk of red-lighting if your opponent burns your clutch down by late staging. With a turbo, sometimes it takes a while to get the car staged. There is no need to pre-load with the Hitmaster, as there is no fluid restriction to slow reaction time.
LAUNCH RPM CHANGES CAN AFFECT YOUR CLUTCH TUNEUP!!! Even without any sort of "centrifugal assist", a typical 10.5" diaphragm style pressure plate can gain around 350lbs of clamp pressure going from 4000rpm to 7000rpm. You can choose any launch rpm you want, but it's a good idea to keep launch rpm consistent if you want consistent results.
TRY TO KEEP CLUTCH TEMP CONSISTENT- Racers that want to go rounds with a clutch pay close attention to clutch temps, as clutch temperature can affect how hard your clutch grabs. Organics will lose friction as the temps go up, while iron actually gains friction as temperatures go up. Most dual friction discs tend to gain on one side while losing on the other. Bottom line is try to avoid "back to back to back" test hits that put heat in the clutch without some cooling time in between.
Chapter 01- The Basics of Inertia Management
Chapter 02- Calculating Inertia's Effect on Input Shaft Torque
Chapter 03- Clutch Slip After the Shifts... Good or Bad?
Chapter 04- Heavier Cars LESS Likely To Break Transmissions?
Chapter 05- Understanding The ClutchTamer
Chapter 06- Understanding The Hitmaster
Chapter 07- The Basics of Analyzing Dragstrip Data
Chapter 08- Flywheel Weight- Heavy or Light?
Chapter 09- Choosing a Proper Clutch & Pressure Plate
Chapter 10- The Importance of a Clutch Pedal Stop
Chapter 11- What's the Best Launch RPM?
Chapter 12- Do You Need a 2-Step Rev Limiter?
Chapter 13- Traction Problems- Adjust Shocks, Chassis, or Clutch?
Chapter 14- Are "Clutchless" Shifts Right For You?
Chapter 15- Traction Control- Yes or No?
Chapter 16- Apply ClutchTamer Tech to an Adjustable Clutch?
CHANGING THE GAME ON LAUNCHING YOUR STICK SHIFT CAR!!!